USER MANUAL
version 1.2.0
Introduction
About Decibel
Designed by award-winning engineers, Decibel features an extensive selection of meters in a completely customizable and resizable user interface. Configure as many or as few meters as desired, and resize each one within the window. You can create different layouts across multiple display tabs and even select a custom color scheme.
One of Decibel’s ground-breaking features is its free companion app for iOS and Android. Open it on a smartphone or tablet, link it to the Decibel desktop application or plugin over Wi-Fi, and the mobile app will mirror the meter display tab of your choice. Link as many devices as you want. Now you can have multiple synced hardware meters running simultaneously in your studio.
Drag and drop audio files onto Decibel’s GUI, and it does a high-speed analysis of the audio in seconds. It then displays LUFS, LRA, and TruePeak readings. You can even export text-file reports of the meter results.
Decibel works in Standalone, AAX, VST3, AU (64bits, Windows and Mac), App Store, and Google Play Store formats.
Jumpstart To Decibel -
Using Decibel as a plugin
Decibel is compatible with most plugin formats (AAX, AU, VST3), 64bits only and is compatible with most DAWs and can be inserted on any tracks.
We recommend inserting Decibel on our master bus as the last plugin in your chain if you would like to analyze the loudness and frequency content of your program material.
Alternatively, you can use as many instances and any track in your session if you would like to analyze one particular sound.
Note: When bouncing music from your DAW, data will go through Decibel faster than in real-time. In order to generate an accurate LUFS analysis, please make sure Decibel is in "TimeCode" mode beforehand.
Using Decibel as a standalone app (Mac Daemon, Windows Wasapi)
Decibel Standalone app allows you to analyze sound and music coming out of your system (Browser, Streaming platform apps, Music etc…) as well as your DAW’s output. This is a great way to have Decibel running at all times and analyze your music being played from different sources.
Mac only
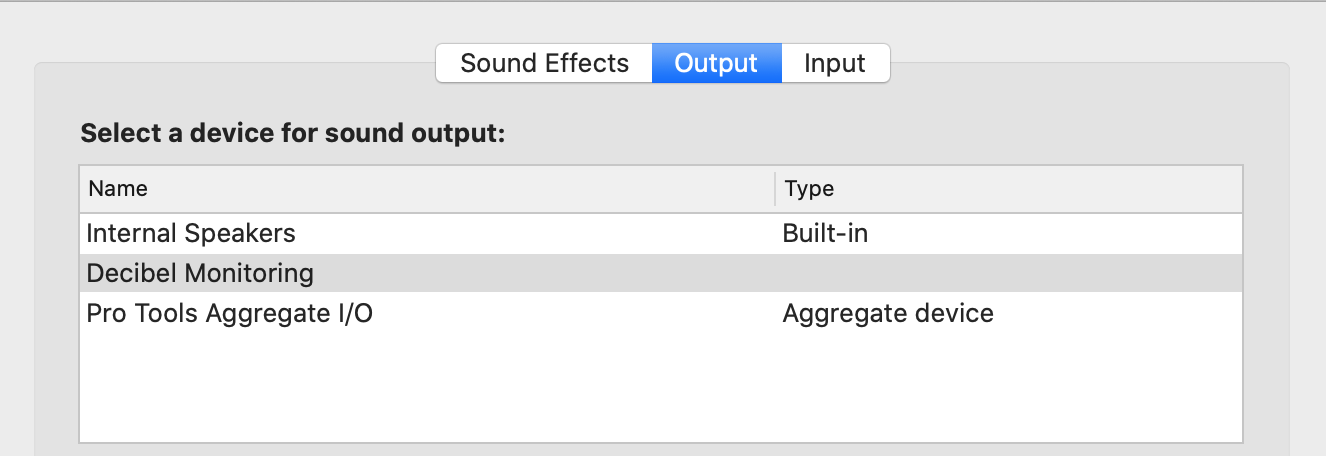
Decibel comes with its own driver called Decibel Monitoring. You can think of it as a patch bay connector in order to insert Decibel between your system and your speakers. You can send your System Default Output to the Decibel Monitoring Driver, have Decibel analyze your sound, and route your audio to your preferred Output Speakers.
See below for what your Core Audio setup should look like.
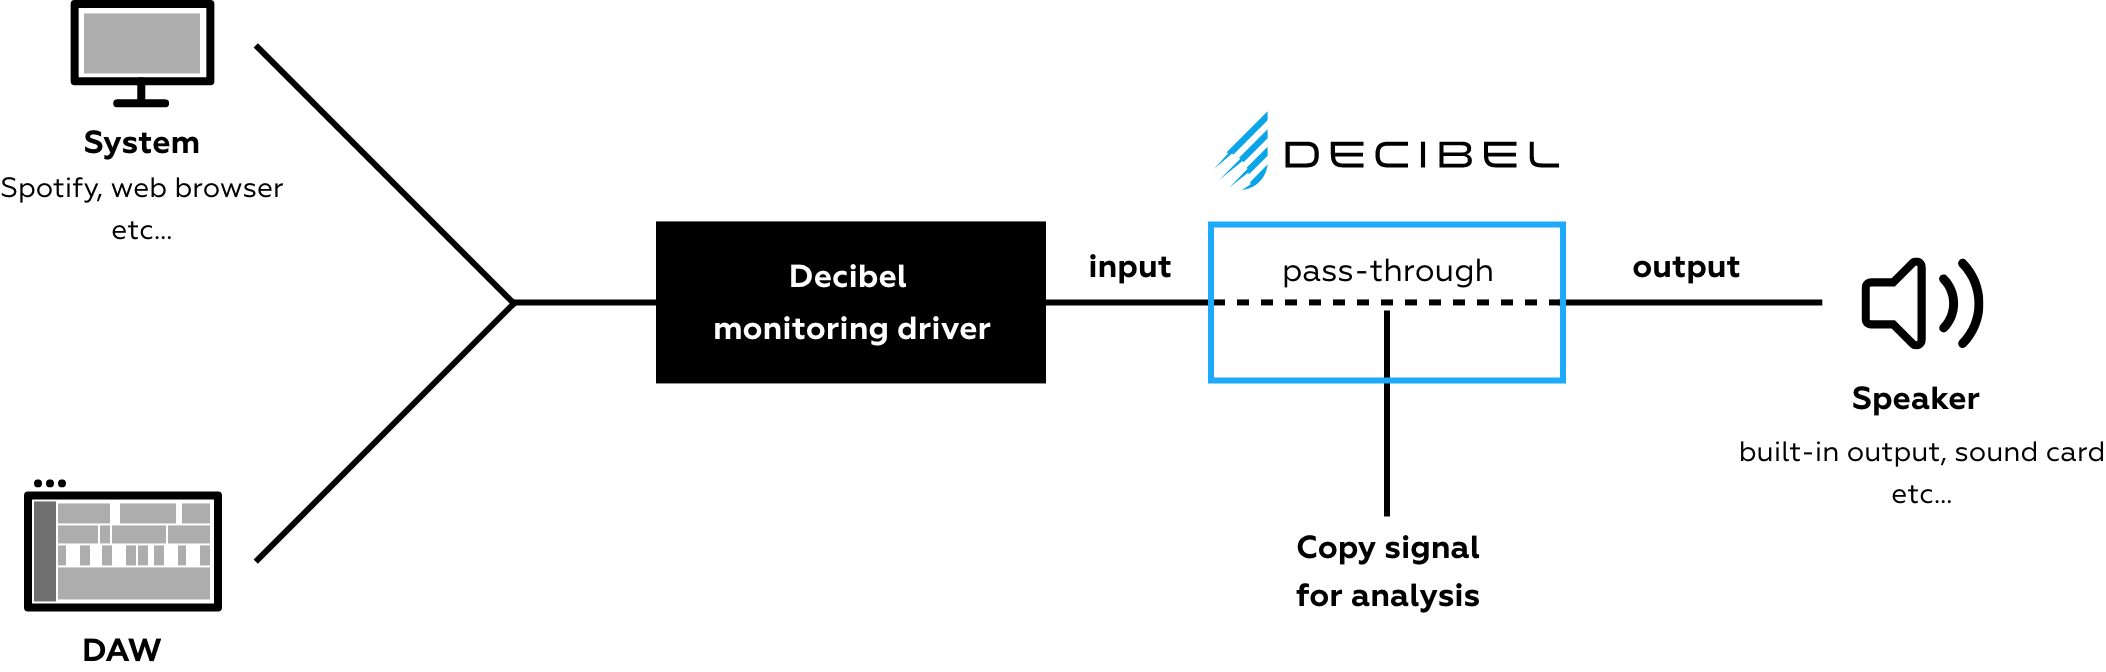
See below for a complete routing schematic.
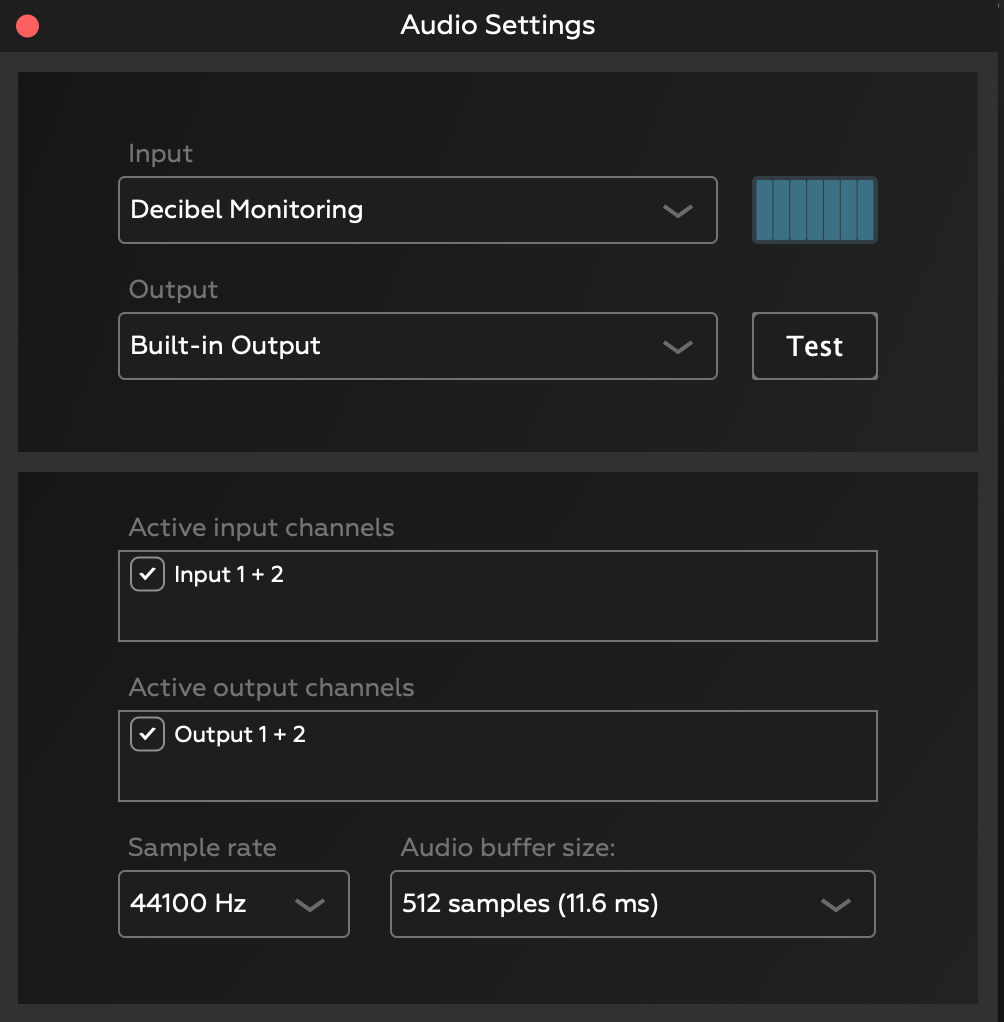
You can select the Decibel Monitoring Driver as an Input to be analyzed from the standalone audio settings:
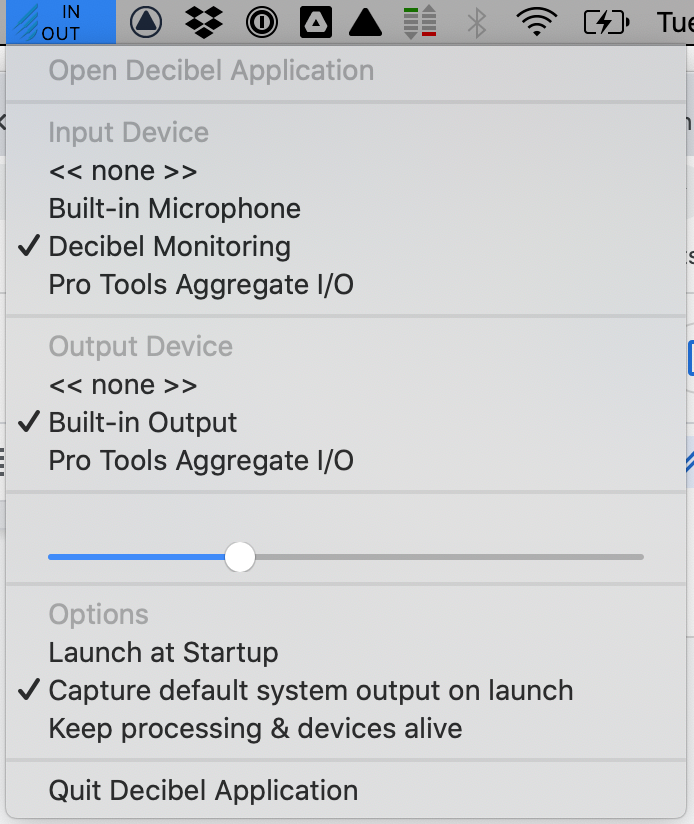
Or directly from the Decibel Daemon in your tray icons bar for quick routing access.
You can then select which Output Device you would like Decibel to route your audio to.
Important note: Decibel makes a copy of the Audio Buffers that will be analyzed and connects its Input to its Output directly, thus making sure audio is not altered by the analysis.
Decibel's monitoring driver provides an elegant way to have all the sound coming from your DAW, Web Browsers, and Streaming Apps go through the same driver for comparison purposes.
Here are 3 Decibel Deamon options to choose from:
- Launch at Startup (Off by default): Decibel will automatically when booting your Mac.
- Capture default system output on launch (On by default): when launching Decibel Standalone, Decibel will automatically insert itself between your System and your current System Output via the Decibel Monitoring core audio driver. This a very convenient way to have sound run through Decibel immediately on launch.
- Keep processing & devices alive (Off by default): When closing the Decibel Standalone GUI, Decibel will automatically stop recording LUFS stop sending data to your Decibel Displays in order to save CPU. Only the Decibel Daemon will stay active, thus not breaking your routing through the Decibel Monitoring Driver and avoiding any audio glitch. If you wish to keep processing your LUFS and keep your Decibel Displays active even when the main GUI is closed, you can select this option.
Windows only
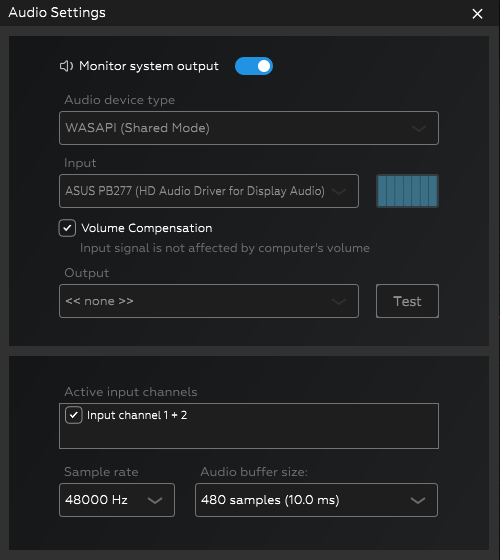
Decibel takes advantage of Windows’ WASAPI drivers loopback capabilities. When activating the Monitor System Output option, Decibel will automatically switch to WASAPI (Shared Mode) which allows the application to get a copy of the buffers sent to your current system output.
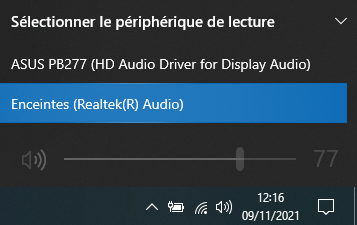
When selecting this option, the Output of Decibel will automatically be set to none in order to avoid unwanted feedback.
You can choose your system output at the bottom right of your task bar.
The volume compensation option will compensate for digital or analog volume modifications and ensure that Decibel analyzes your sound at the same level.
This WASAPI spying option paired with the Volume Compensation option is an elegant way to monitor all sounds coming from your DAW, Web Browsers, and Streaming Apps without having to reroute your system every time.
Alternatively, you can use Decibel as a routing device by using any Device Type (WDM, Asio etc…) and any Input / Output devices.
Connecting Decibel Displays (iOS, Android). Quick start.
Decibel comes with a free app on the Appstore and Google Play Store that allows you to receive data from any Decibel instance (plugin or standalone) and turn your mobile device into a Decibel Display.
In order to connect a new Decibel Display:
- Download and install Decibel Display on your mobile device and launch it. (links on the product page)
- The app will tell you which IP address it is using on your Wi-Fi or USB connectors.
- Open the Display Manager and enter your device’s IP address. You can also rename it.
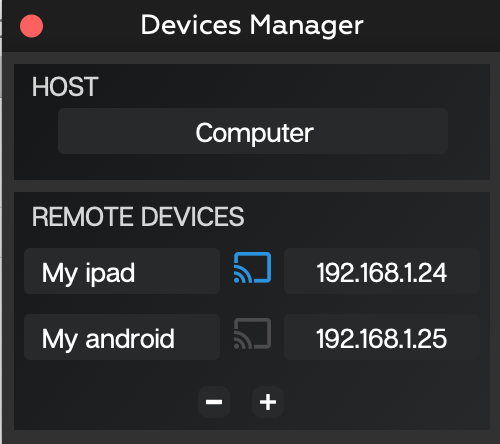
If everything goes as planned, the connection status icon will turn blue.
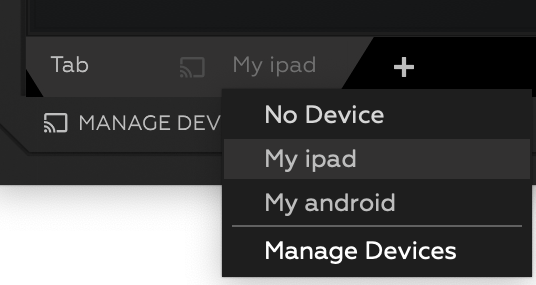
- Pick a Decibel tab and assign it to your new Decibel Display. Your are now sending data to your device.
Troubleshooting:
- Please make sure your computer and mobile devices are connected to the same Wi-Fi network
- Please make sure you are not using any firewall that block decibel’s connections
- Please make sure you’ve entered the IP address properly
Offline Analysis (music and video)
Decibel allows you to analyze most music and video files on your drive (wav, aiff, webm, flac, mp3, aac, mp4, mov, mkv etc…). This is a convenient way to analyze your program material at high-speed without having to run it in real time through Decibel and wait for the final result.
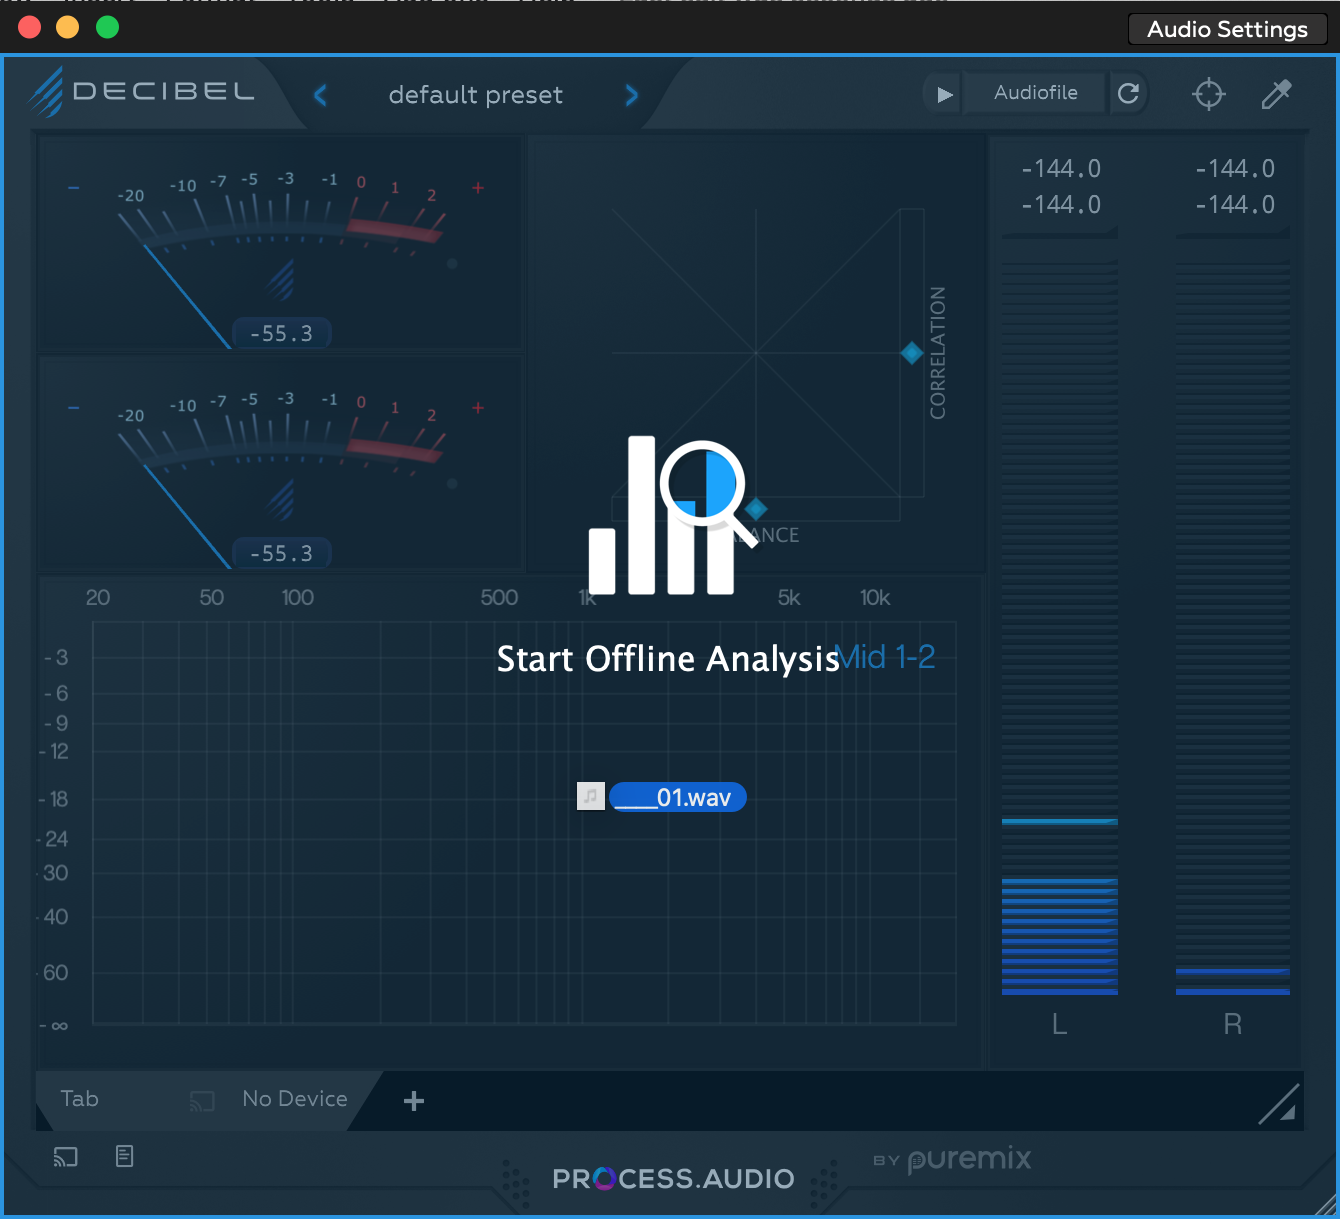
Simply drag & drop your file on Decibel (plugin or standalone) and wait for the final result.
You will be prompted with the Reporting Panel (see below) that allows you to screenshot or export your data from.
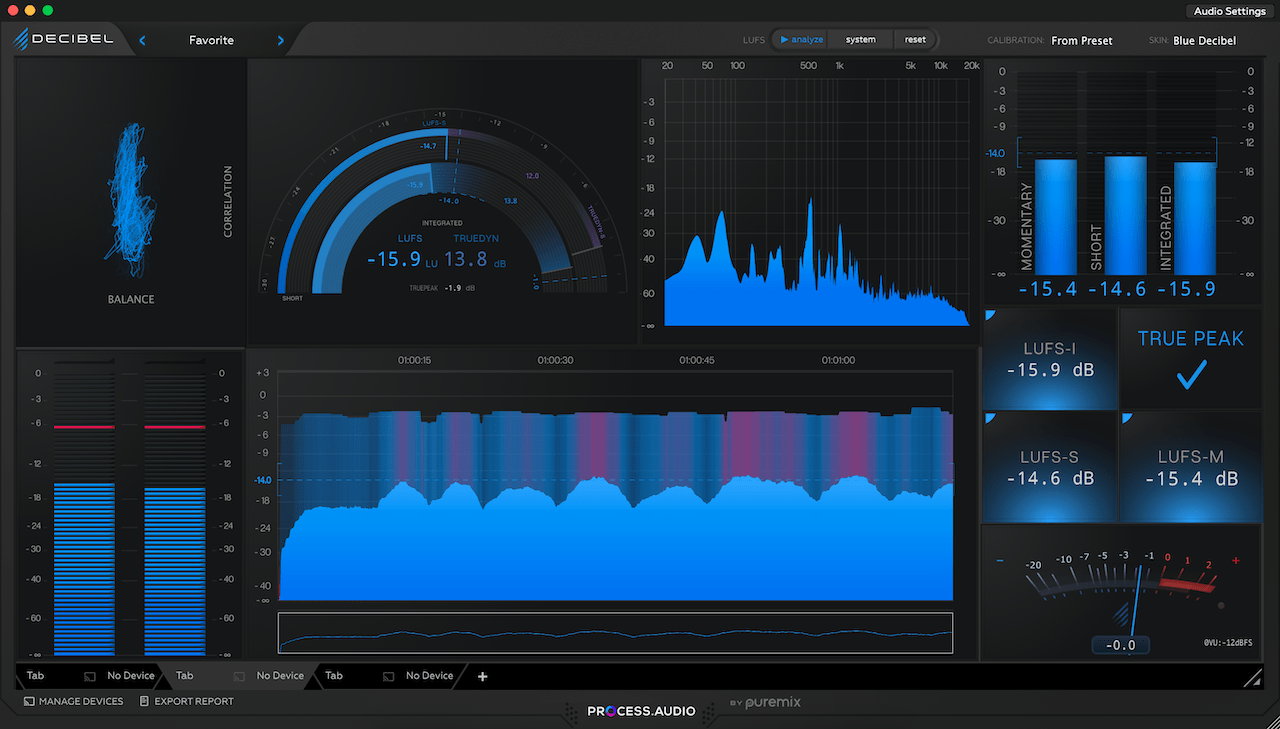
The Decibel interface
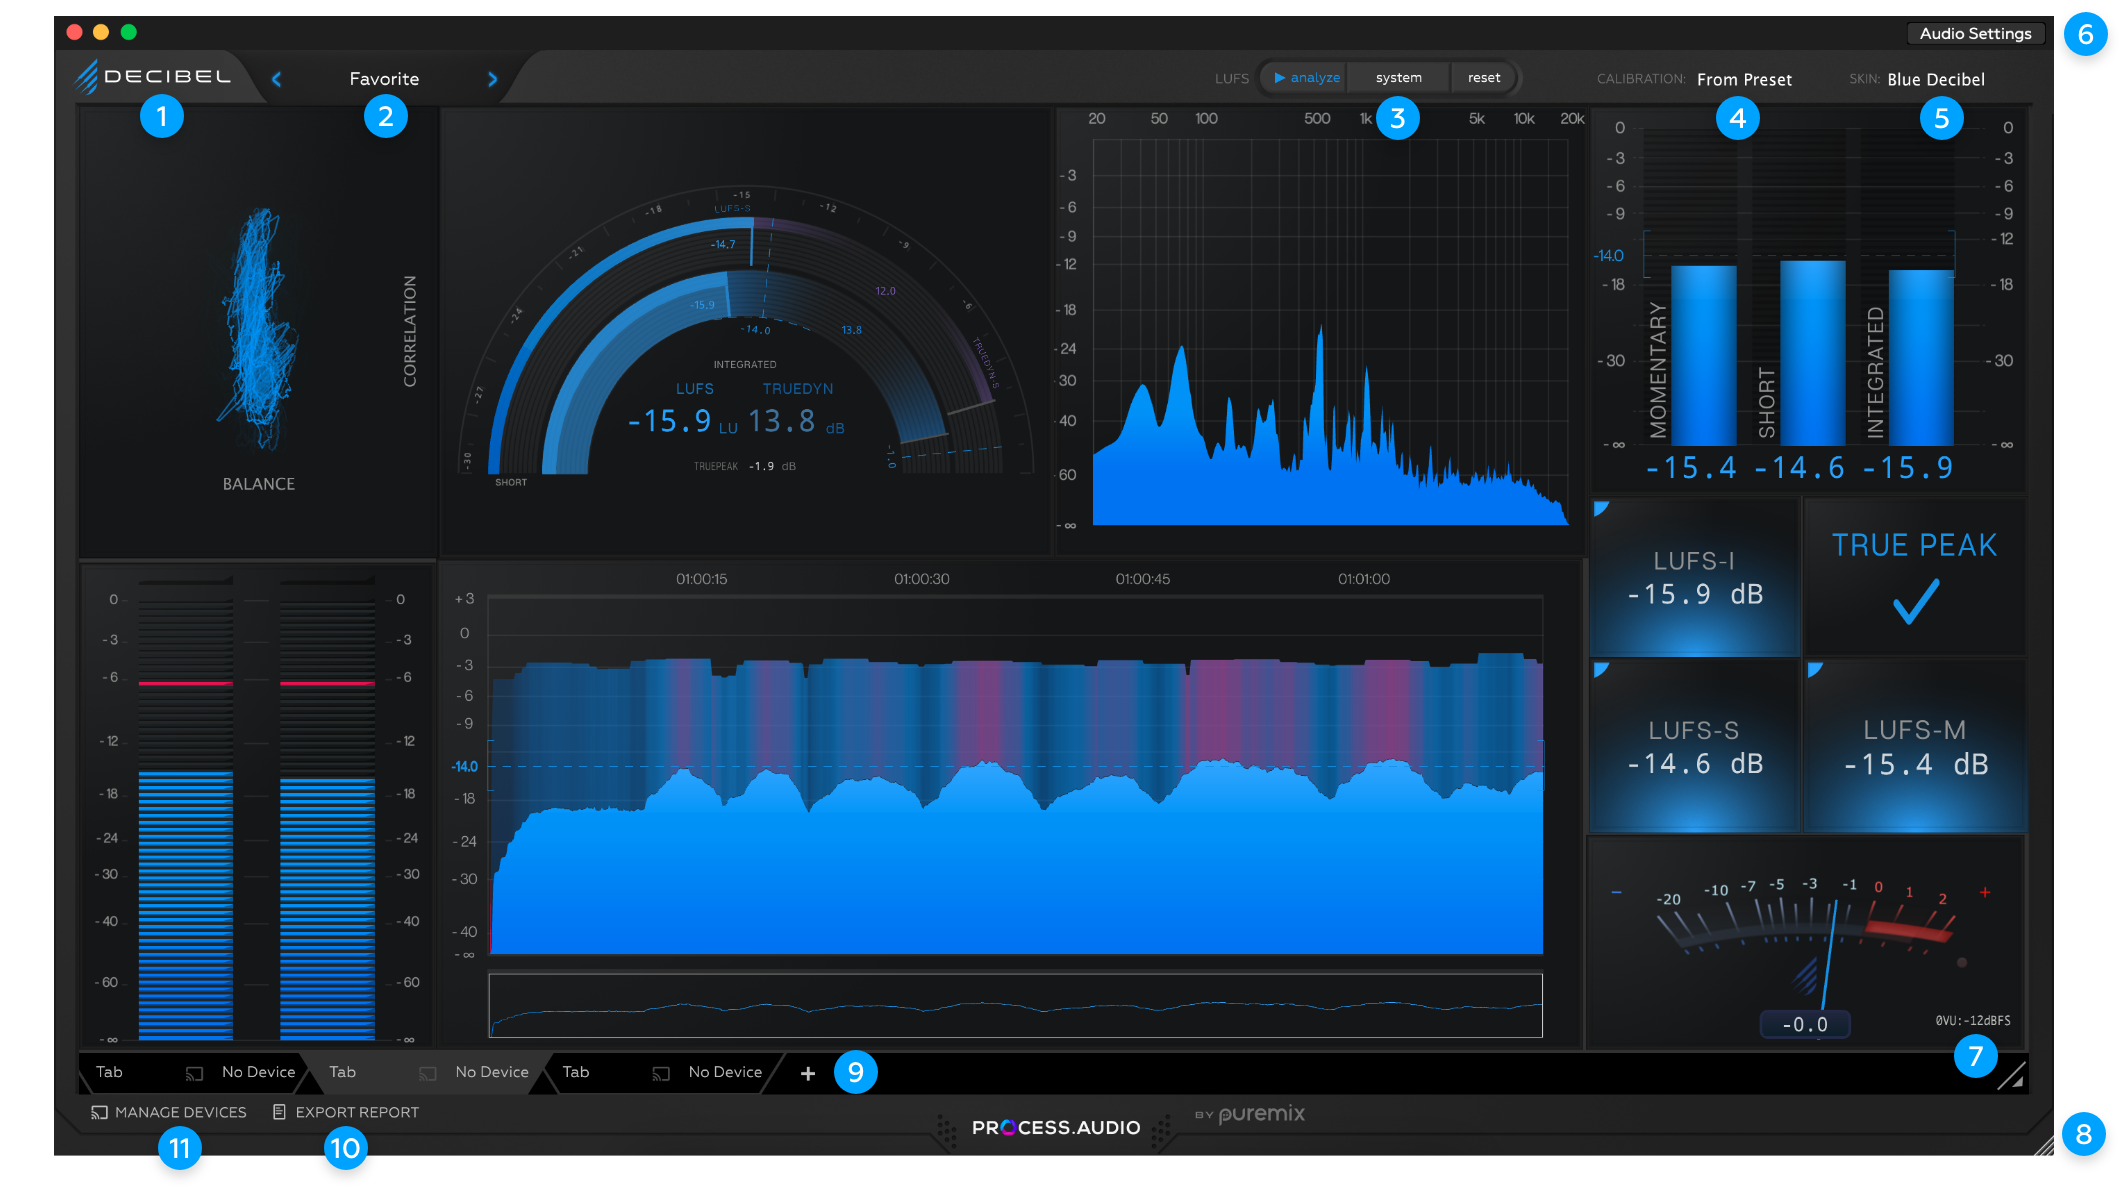
Options
Decibel's main menu will show you several website links and options.
FPS: you can decide if your Decibel plugin or standalone versions will render at 30fps or 60fps. You can also choose which frame rate Decibel Displays (Android, iOS) and the Decibel plugin will render at.

You will also find a list of convenient keyboard shortcuts in order to browse, resize, change color themes etc… quickly.
Presets
Presets are organized just like in every other application or plugin. You can organize the folder structure any way you please.
A Decibel preset will remember your layout, tabs, and the tabs mobile Decibel Display assignment. When browsing through your presets, your tabs will automatically connect to the desired Display.
Presets position, height, and width are stored in relative values. If you save a preset on a particular screen, it will open up on a different screen, looking exactly the same.
A Preset will also remember what Calibration and Skin were loaded when you saved it. This way, you can leave the Calibration and Skin drop-downs on “from preset” and have your Presets remember and recall your Calibration and Skins. Alternatively, if you pick a specific Calibration or Skin, browsing through presets will not alter Calibration and Skin.
LUFS control bar
There are three controls in the LUFS control bar.
- Record status. If the arrow is blue, it means Decibel is recording your LUFS level. If it is white, then it's paused.
- LUFS mode.
Continuous: The LUFS recording starts from 00:00:00 until you stop it.
System: The LUFS recording corresponds to your computer's clock.
Elapsed (plugin only): The LUFS recording will reset and start recording again every time you hit play on your DAW.
Time code (plugin only): The LUFS recording is synced with your DAW's timeline. Hitting play/pause does NOT reset your recording. Instead, the data tied to a specific time code will override its previous value. This way, you can always get a bird's eye view of your music, and the LUFS recording is updated as you make changes.
Decibel's LUFS recording / analyzing time limit is currently set to 4 hours.
Calibration
Decibel comes with several Calibration presets that will help you monitor and deliver your music at specific levels. This menu works just like a preset menu, except it is for Calibrations only.When set to “from preset” the Calibration will follow the Calibration data recorded in the selected Preset.
- VU Calibration: This is the dBFS value that will correspond to your 0 VU value. It is particularly useful when monitoring recording levels in order to make sure your input signal hits your converters at their sweet spot (usually -12 / -14 dBFS).
- True Peak Max: This is the maximum True Peak Max value that Decibel will tolerate before raising a warning. It will show up as red dots on the LUFS histogram, a red cross on the Validator module, and a red dashed bar on the Super Meter’s inner circle if your True Peak Max exceeds this value. Otherwise, it will stay blue.
- LUFS-I Target: This is your Integrated Loudness Target. Decibel will base its reports and visual feedback (Super Meter, Number Box, Validators etc…) based on this target. If your program material is close enough to this target (LUFS-I Tolerance, see below), the LUFS-I target will turn blue. Otherwise, it will stay red.
- LUFS-I Tolerance: The LUFS-I tolerance is how much deviance from the LUFS-I target you will tolerate before Decibel reports that you passed/missed the LUFS-I target. Ex: if your LUFS-I Target is at -14LU with a LUFS-I Tolerance of 0.5dB, then Decibel will report that your material met the target if its LUFS-I measurement lands between -14.5 and -13.5 LU.
- LRA Max: This is our Loudness Range Max value used by Decibel in its report. If your program material exceeds this value, it will turn red in Validator modules and your Export Panel.
Skins
Decibel comes with several skins to match the look of your studio. You can create your own skins in the Skin panel and edit / save them like presets.
When set to “from preset” the Skin will follow the Skin data recorded in the selected Preset.
Audio settings (standalone version only)
In this panel, you can select your active Input and Ouput channels, Sample Rate and Audio buffer Size.
The sample rate will listen to the Audio Settings Input and Ouput events and will automatically change and adapt to what sources and devices it is connected to.
We recommend leaving the Audio Buffer Size to its default value (512 samples).
Mac
In this panel, you can choose which core audio driver Decibel will be monitoring. These settings mirror the Input and Output selection you made in the Daemon section. See Using Decibel as a standalone app section.
Windows
In this panel, you can choose which Audio Device Type and Input Decibel is monitoring as . See Using Decibel as a standalone app section.
Resize canvas
Each Decibel Tab has an internal canvas that can be used to draw modules on. Before adding a module, you will need to reveal empty areas of the canvas to click on it and choose which module you would like to add.
General resize
You can easily resize the Decibel GUI by dragging its bottom right corner.
By holding the Shift key, you can preserve Decibel’s aspect ratio. This feature is particularly useful when you’ve created a Tab which aspect ratio is just right for a specific Decibel Display.
This way, you won’t alter its final rendition and the external display while making it bigger / smaller on your computer.
Tabs
You can think of Decibel Tabs as spreadsheets. They are part of the same preset and can each contain a different layout of modules. You can add, rename, delete and move tabs around.
You can easily switch from Tab to Tab with keyboard shortcuts (see keyboard shortcuts in Decibel’s menu).
Tabs layouts and connections are stored in your preset.
Each Tab can be used to send data to an external Decibel Display that you manually set in the Decibel Display Manager.
The connection status icon will light up in grey / yellow / or blue if the device is not found / idle / connected. (see Decibel Display Manager)
Export report
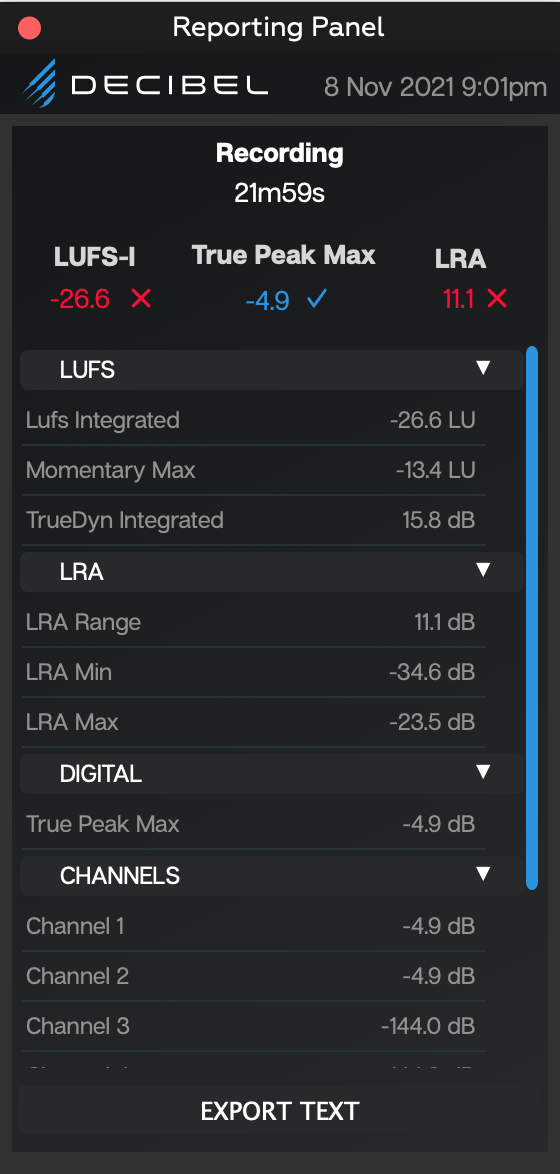
The Reporting Panel will open automatically after you’ve performed an offline analysis and the LUFS analysis has been paused by dragging & dropping a file (video or music) on the interface. Alternatively, you can open it at anytime, and will show you various LUFS data about your recording.
You can export this report in a *.txt file.
Manage displays
The Decibel Display Manager panel is used to manage connection from your computer to your external Decibel Displays.
You can add as many Displays as you want and rename them.
Every Display in this panel must be associated with one unique IPs that is showing on your mobile device when you launch the app.
The connection status icon can light up in three different colors:
- Grey: the Display was not found. Please make sure you have entered the device’s IP correctly and are NOT using any firewall.
- Yellow: this Decibel Instance cannot send data to this Decibel Display, as it is already receiving data from another Decibel instance. You can Force Pair with this Decibel Display and ‘steal’ it from the other instance by clicking on the connection icon.
- Blue: Decibel is connected to the Decibel Display and is ready to send data as soon as a Tab is assigned.
The Decibel Display Manager settings are saved and shared across all Decibel instances (plugin or standalone).
The modules
Decibel modules are all resizable, can be added, deleted, and moved around. They all have a different minimum size that fits their purpose, as well as several specific options you can choose from by right-clicking on it or from their respective burger menus.
Adding a module:
When clicking on an empty area of the Decibel canvas, a pop-up menu will appear that lets you select which module you would like to add.
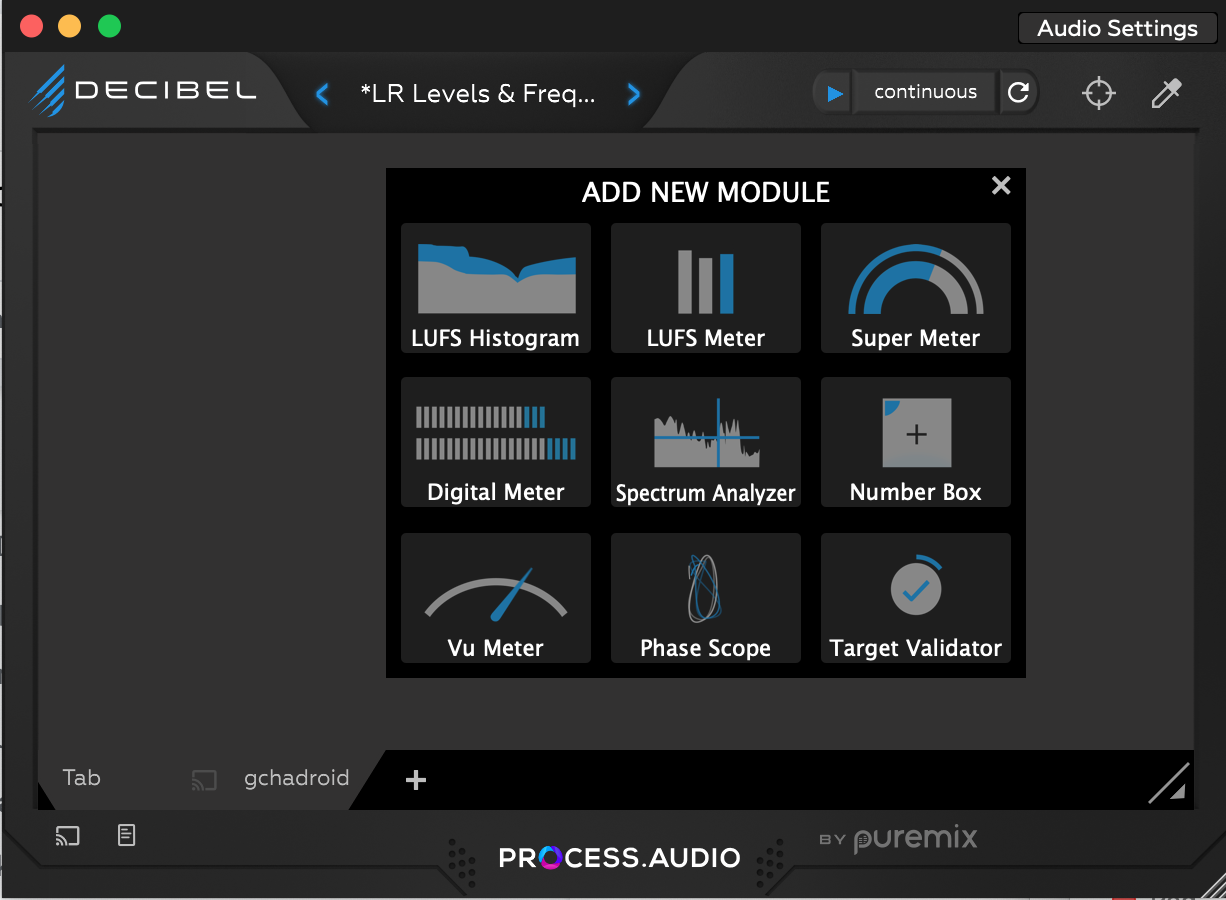
You can then position the module anywhere it fits on the canvas.
Tip: Holding the shift key will make the module fill up the available space on the canvas.
Duplicate a module
You can duplicate a module by holding the Alt key and dragging your mouse or right-clicking on the module and choosing the Duplicate option from the menu that appears. This is a particularly useful option when you would like to create a template with various Number Boxes or VU meters that need to be the same size.
Resizing
You can resize a module by grabbing its bottom right corner. Alternatively, you can Shift-click on a module to resize it to the nearest edges and fill up all the space available. Each module has a minimum size it can be displayed at. Some modules can be rendered very small, like Number boxes, while some need to be rendered at a larger size to be readable. If you resize a module under its minimum limit, a static image placeholder will replace its final rendition.
Deleting a module
You can Alt right-click on a module to delete it or right-click on it and select Delete from the options available.
Options
Every module has a specific list of options that will allow you to customize its look, time constants, etc. Your options settings are saved at the preset level. When browsing through presets, your layout and respective modules options will be recalled.
Super Meter
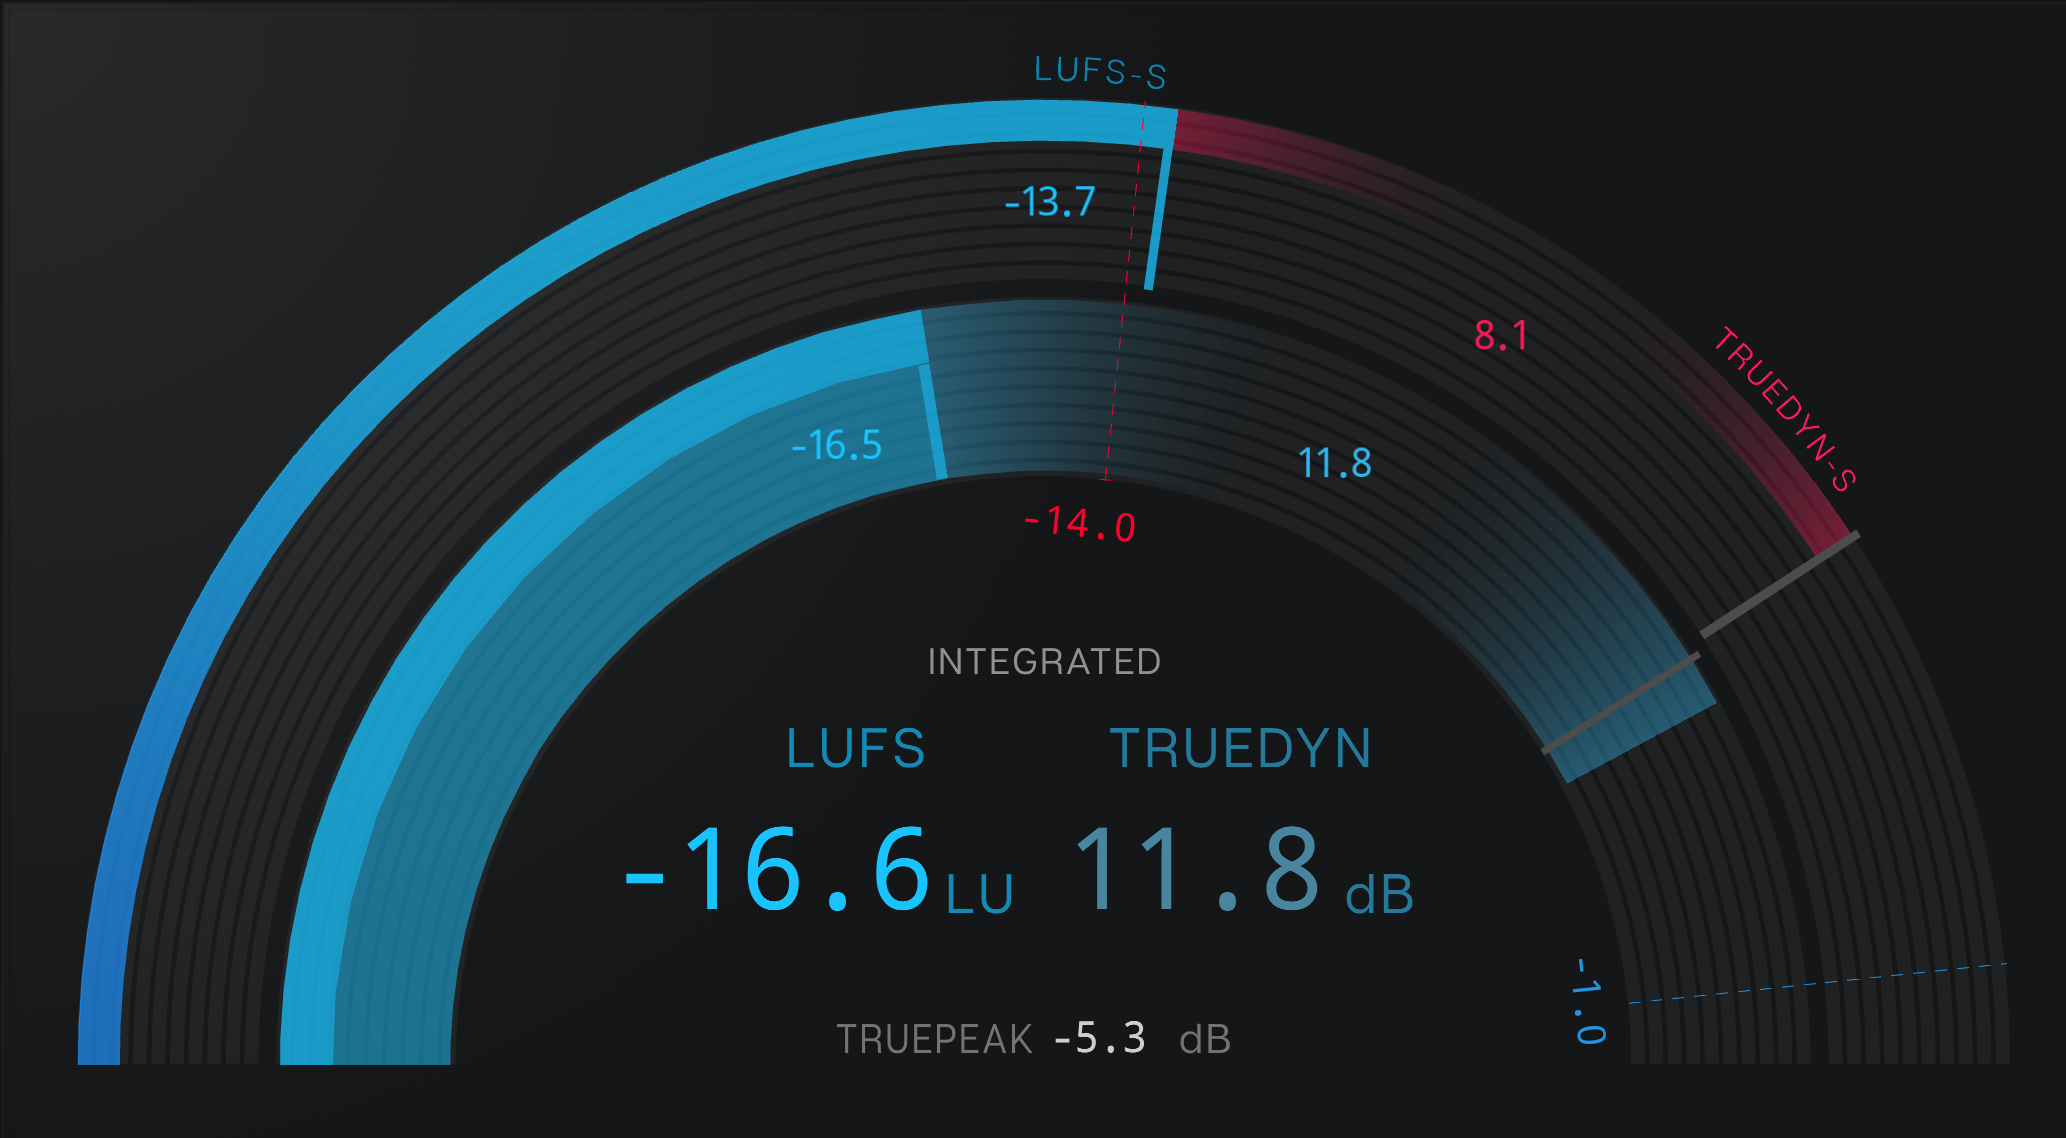
The Super meter is a unique way to visualize the three most important measurements of your program material. Loudness (LUFS), dynamics (TrueDyn), and peaks (True peak). The outer rim displays short-term measurements (3-second time span) for a real-time view of your program. Respectively your LUFS-S, TrueDyn-S, and True Peak over a 3-second sliding window.
The inner rim displays your integrated measurements (since the beginning of your recording). Respectively, your LUFS-S, TrueDyn-I, and True Peak Max. Those 3 values are also primarily displayed in the middle of the module for better visibility.
You will also see your LUFS-I target and True Peal Max limit that will strike through both rims.
They will remain blue if your targets are met and remain red otherwise.
You can customize your Super Meter by hiding/showing the targets or the scale.
LUFS Meter
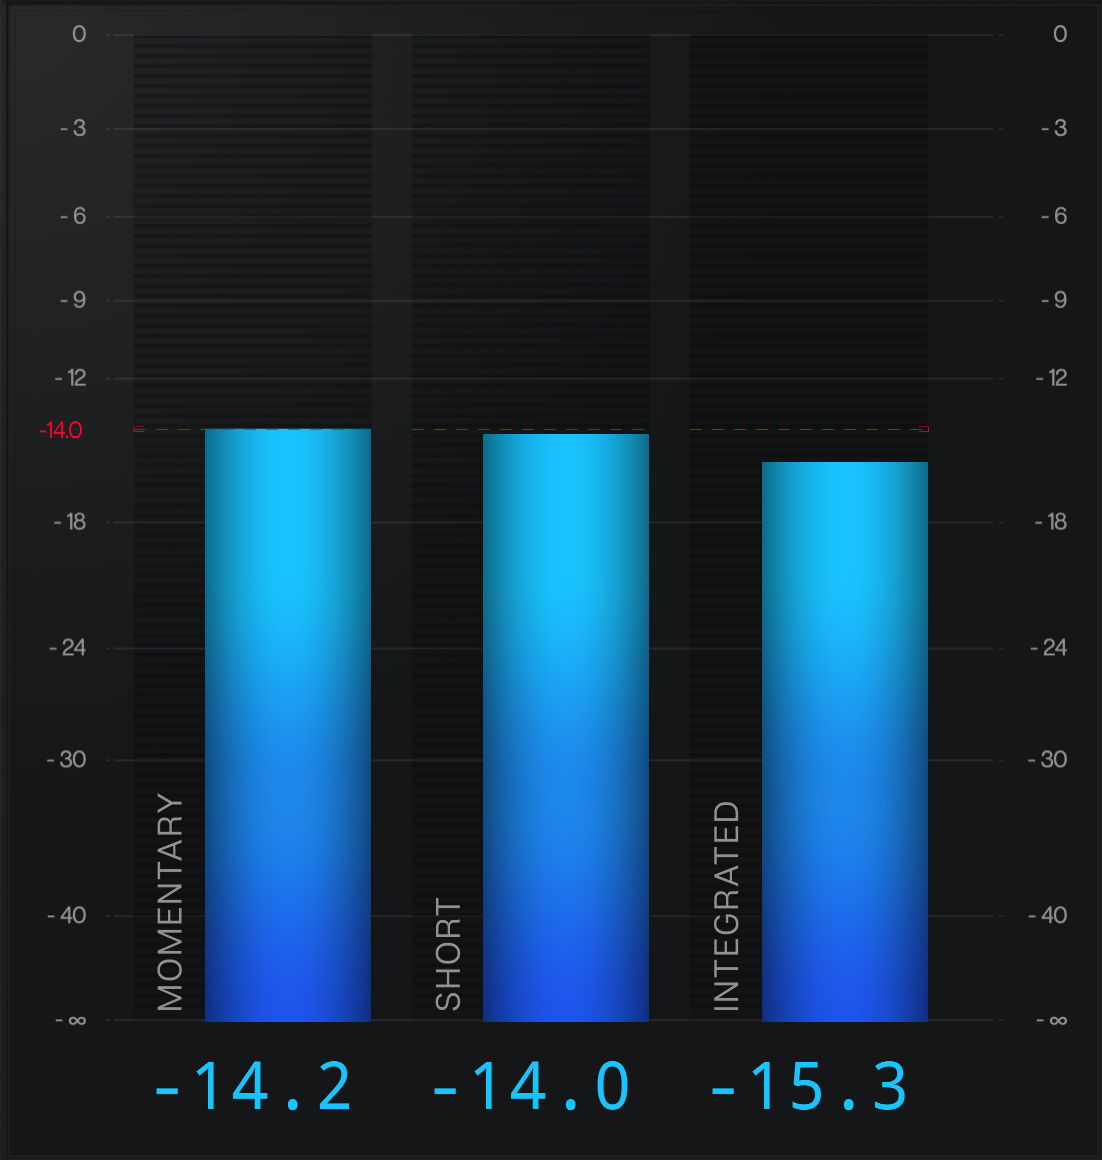
The classic LUFS meter will show you the LUFS momentary (400ms), LUFS short term (3s), and LUFS Integrated values of your signal. The LUFS momentary value gives you an instant representation of your material's loudness level, whereas the LUFS integrated value represents your average loudness from the beginning of the recording. The goal is for your LUFS integrated value to settle on your LUFS target value before delivering your material. Conveniently, you can choose to hide/show the LUFS-I target or the scale or decide which gauge you would like to see (momentary, short, integrated).
Histogram
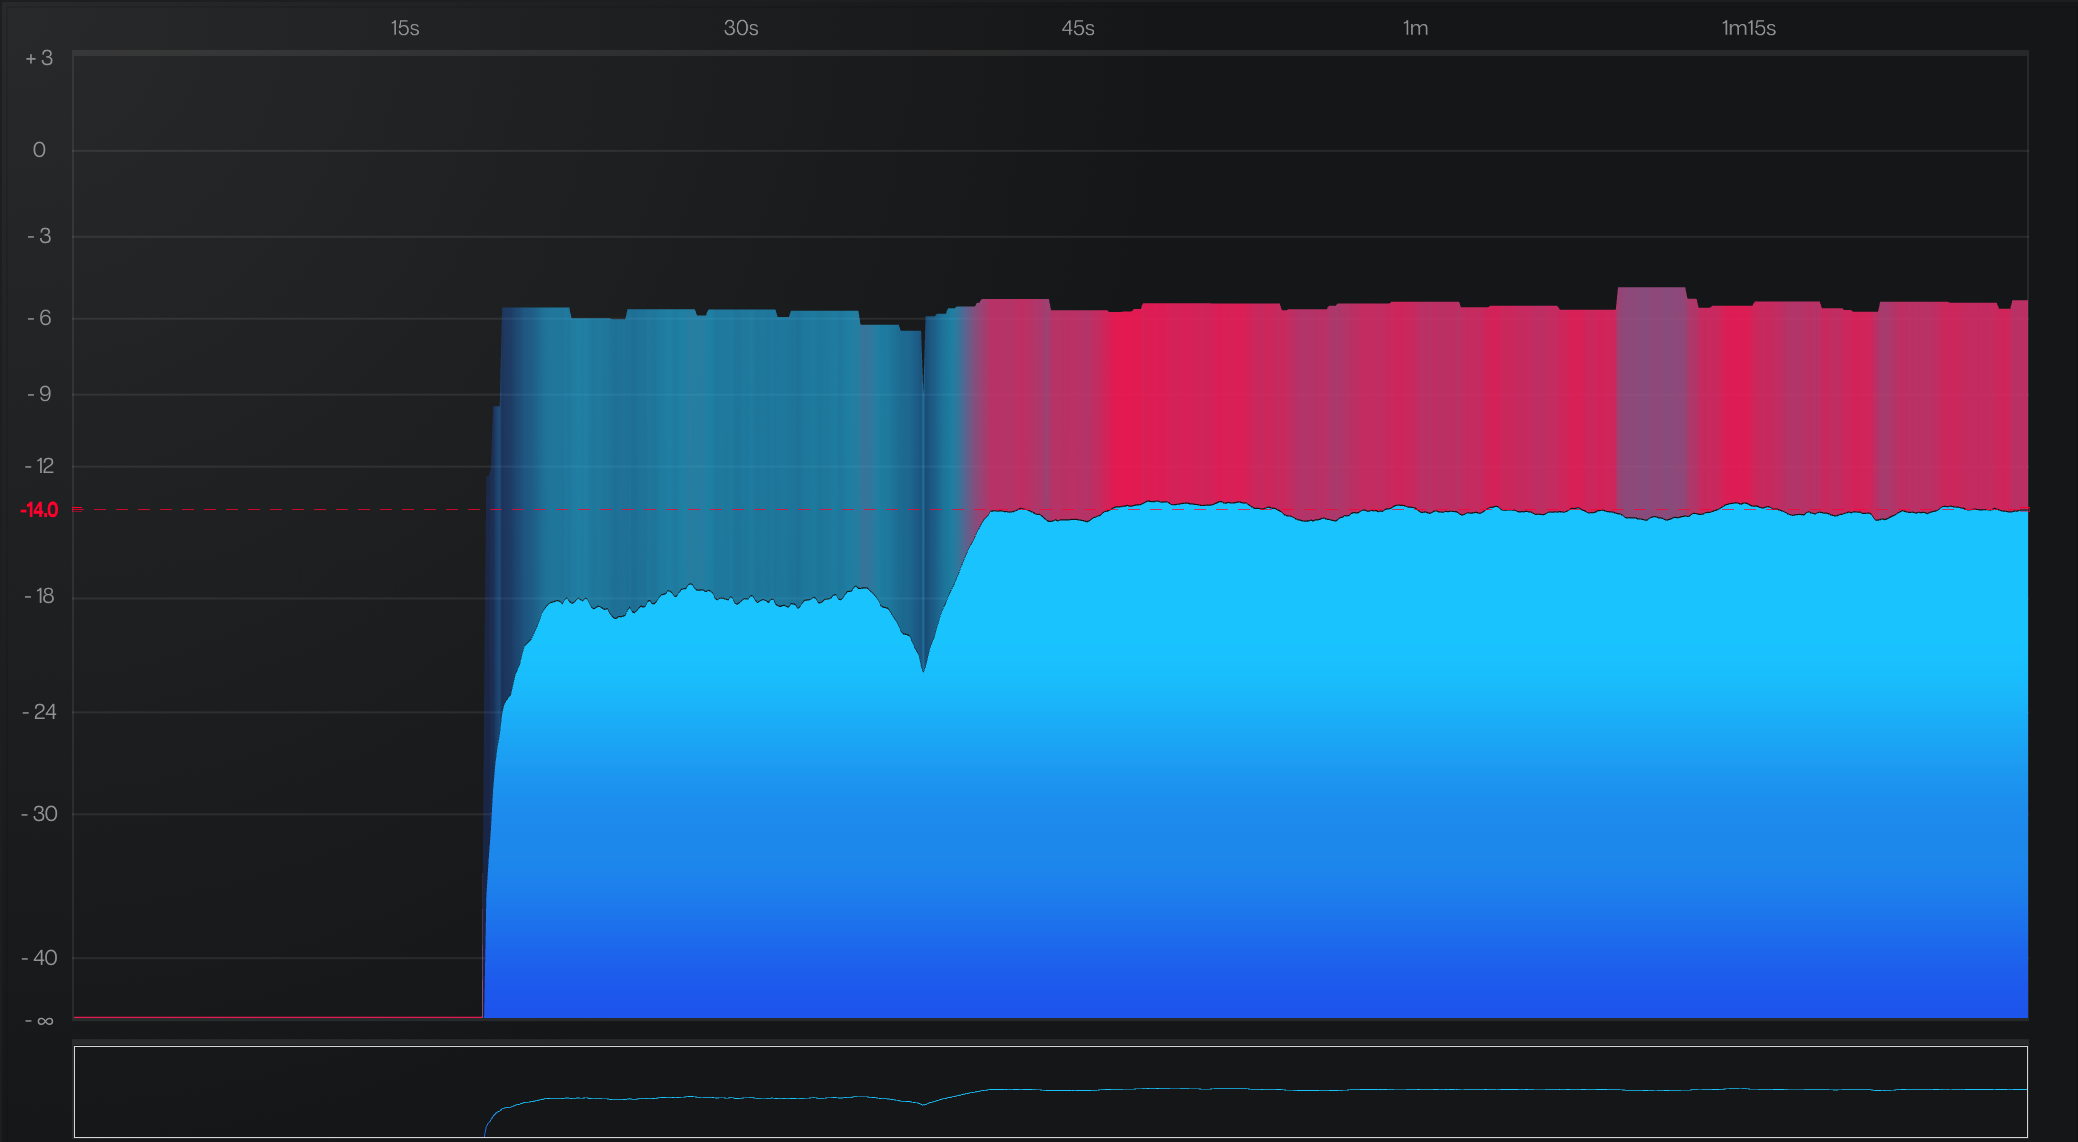
The LUFS histogram represents your music's loudness (LUFS) and short-term dynamics (TrueDyn) over time. It is the best way to compare different sections of your songs and see how their loudness and dynamics evolve and compare to one another. You can also see if your material exceeded your True Peak Max limit with red alert dots on the timeline. The inferior part of the histogram is called the universe and keeps a zoomed-out, bird's eye view of your content at all times.
There are three modes in this histogram.
- There are three modes in this histogram.
- In FIT mode, all of your program's loudness recording will be shown on screen. This is a practical way to see your entire program at all times. You can double-click on the universe to activate the FIT mode.
- In FOLLOW mode, the histogram will keep your current zoom setting and will make sure to keep your play head on-screen at all times. You can double-click in the histogram to activate the FOLLOW mode.
If neither of the two modes is selected, you are in FREE mode and can easily browse your histogram recording.
The mode you select will be saved in your preset for better recall purposes and carry over to your Decibel Display. This way, you can decide to leave your histogram permanently in FIT mode across presets and devices if you wish to do so.
This histogram is particularly useful when using the various modes of the LUFS recording (See LUFS control bar section). Especially when using Decibel as a plugin, in Time Code mode where the histogram's playhead will sync to your DAWs playhead and override its previous values and writing over a time stamp that was already measured. It is a precious tool if you would like to see your chorus against your verses and bridge, for instance. You will be able to see their respective loudness (LUFS-S) and dynamic (TrueDyn-S) and assess how your song evolves.
You can choose to show/hide the scale, the universe, the LUFS-I, and more. Fully customizable.
Digital Meter
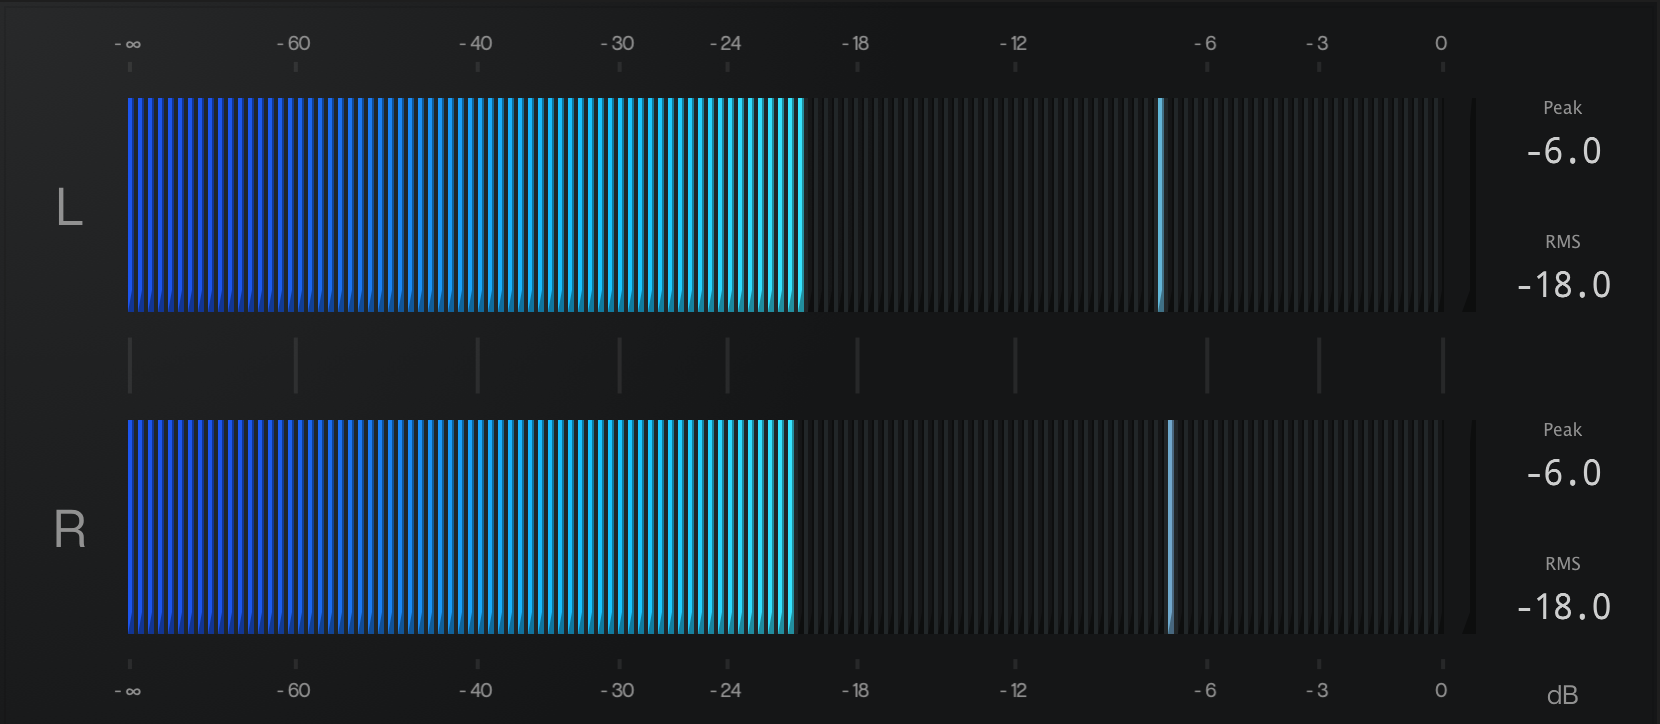
Before the LUFS norm got into the picture, levels were calculated using the RMS standard. RMS is the typical gauge we are all used to seeing because this is what we use on every track of every DAW. It is still very practical and straightforward.
This module can be displayed vertically or horizontally, depending on its aspect ratio.
It also comes with several layouts that are compatible from stereo up to 7.1 channels.
You can choose which peak you would like to see (Peak or True Peak), customize peak hold time constant, RMS decay time, and zoom into your dB scale for better precision in the loudest parts.
A clip LED can be reset by clicking on the module or tapping on the Decibel Display device.
Spectrum Analyzer
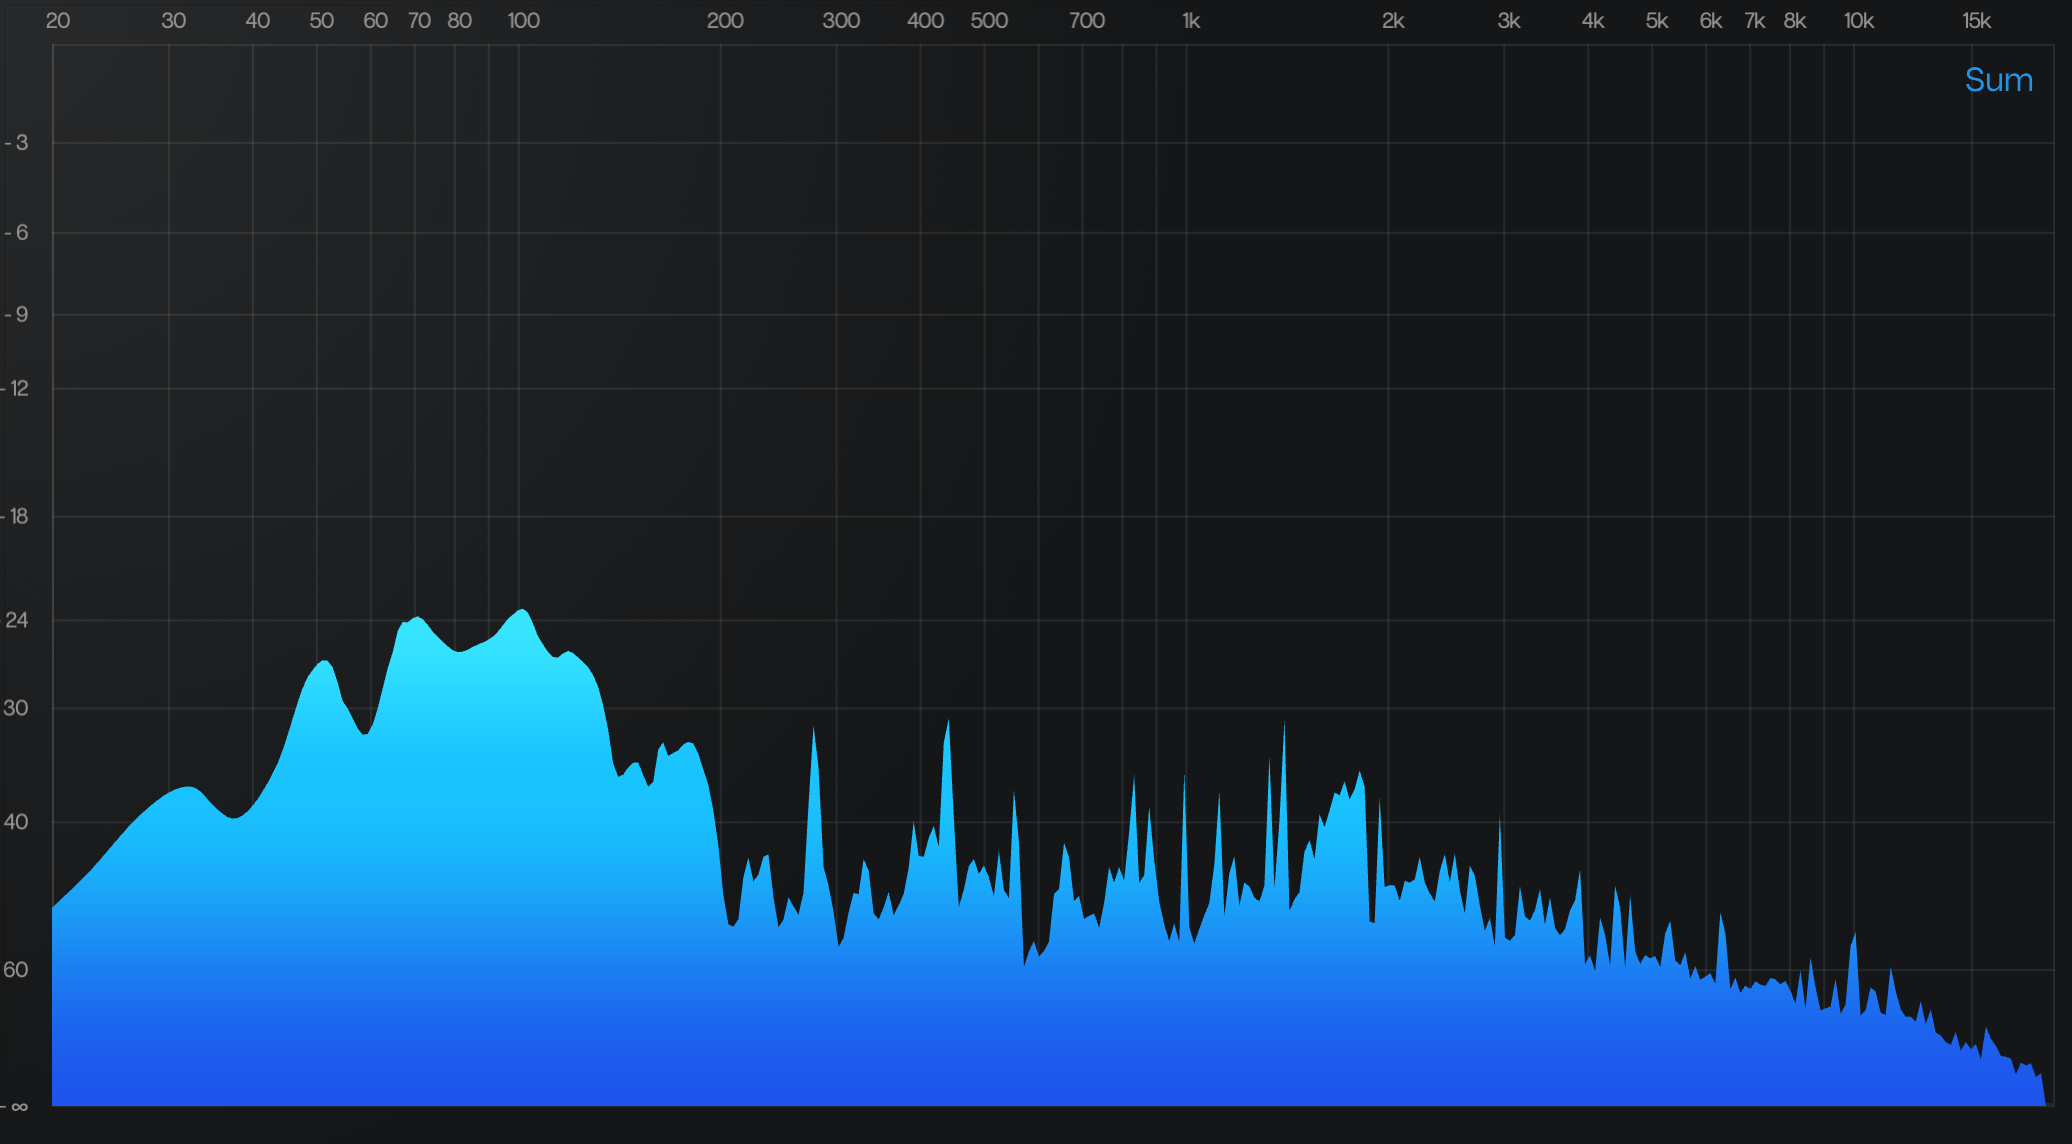
Having access to a real-time frequency analyzer allows you to compare your music to reference material or pinpoint issues such as problematic resonating frequencies or frequency build-ups throughout your mix.
You can easily zoom in on the left part of the spectrum for better precision at the low frequencies.
You can choose to display your frequency peak hold and analyze several channel settings such as Left, Right, Mid, Sum, etc.
The analyzer comes with different speeds and the usual weighting options (A, C, normal).
Spectrogram
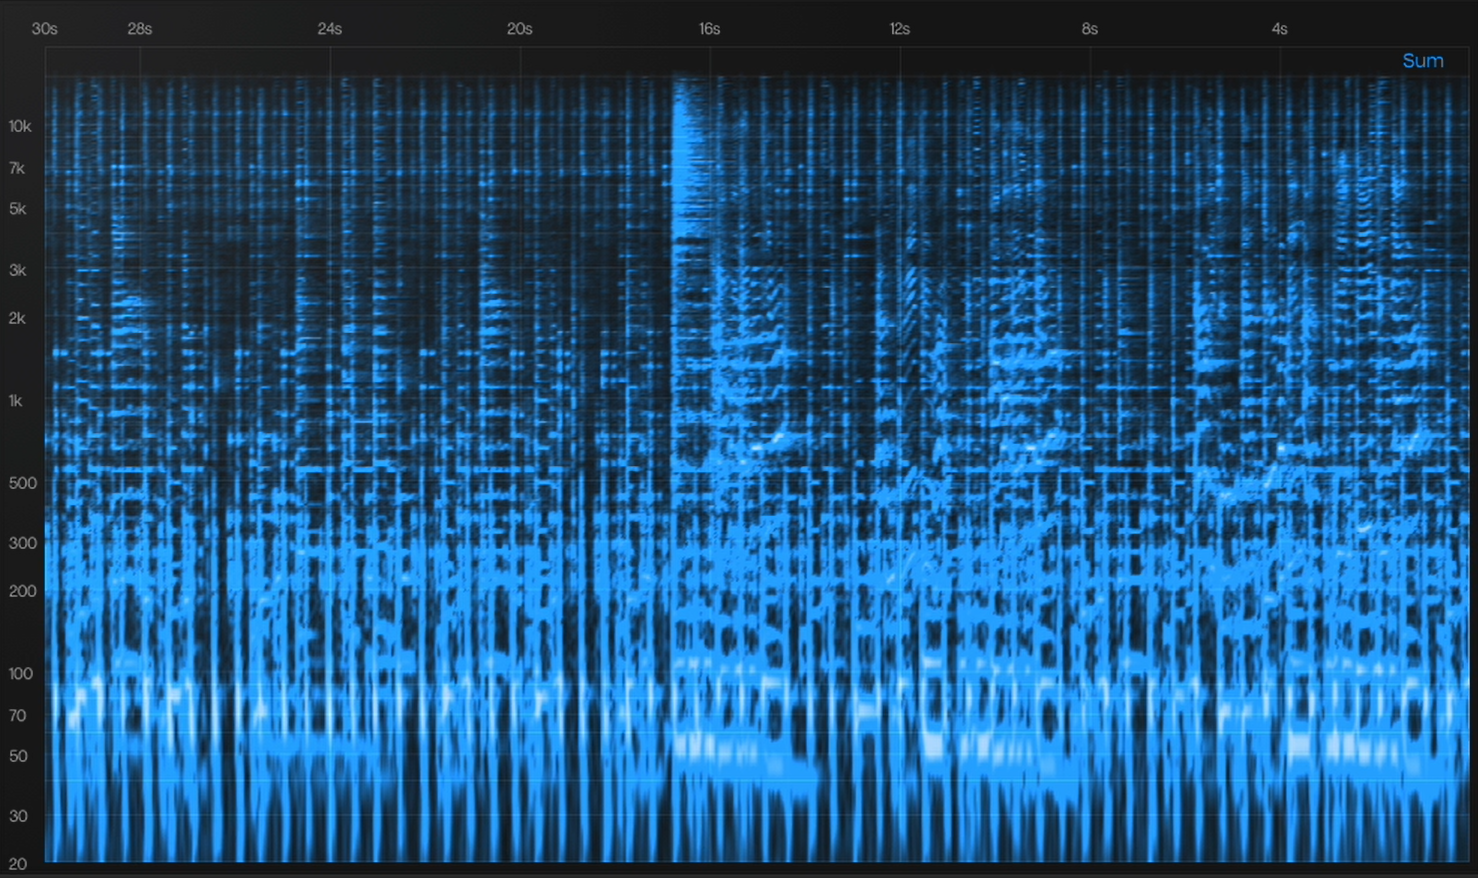
The spectrogram will give you a visual representation of the spectrum of frequencies of your music as it varies with time. You can think of it as a printed history of your spectrum analyzer.
The Decibel spectrogram is fully customizable and you can choose to print right to left or top to bottom. You can also zoom in on the time axis and print from 5 seconds to 30 seconds of data.
Number box
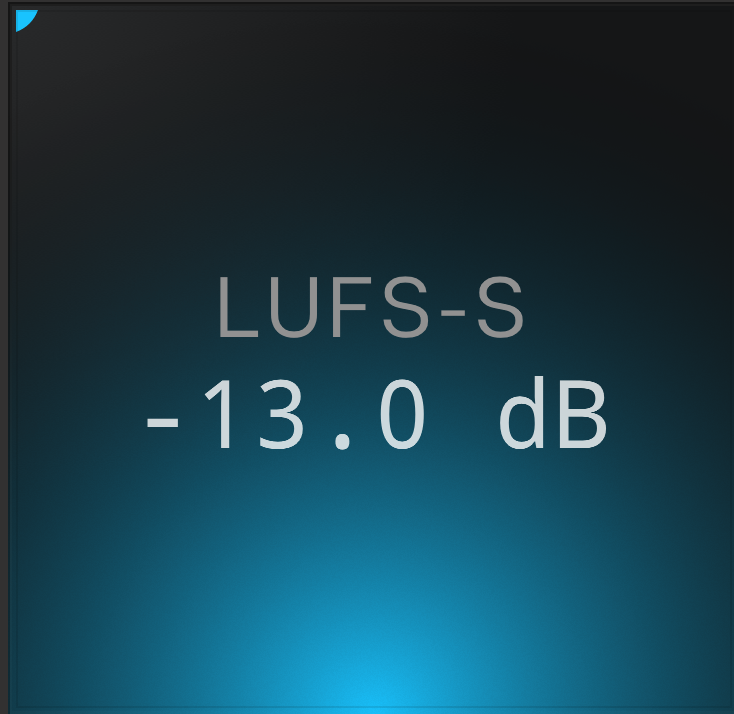
Number boxes allow you to display just about everything computed by Decibel. From LUFS, RMS, and TrueDyn levels to crest factor, LRA, and True peak.
VU Meter

VU meters will help you manage your recording levels and avoid overloading, distortion, and help you hit your digital converters at their sweet spots by calibrating the meter's 0VU level accordingly. The needle's momentum is set to approximate the human ear response and is well known to be the most 'musical' metering system.
This VU meter has been designed according to the official VU norm (300ms stabilization). It has also implemented the needle overshoot aspect (less than 1%), making for VU's well-known 'analog feel.'
This VU comes in three different flavors: Vintage, Modern, and Destroyed, and can show several channel settings: mono, stereo, mid, side.
Phase Scope
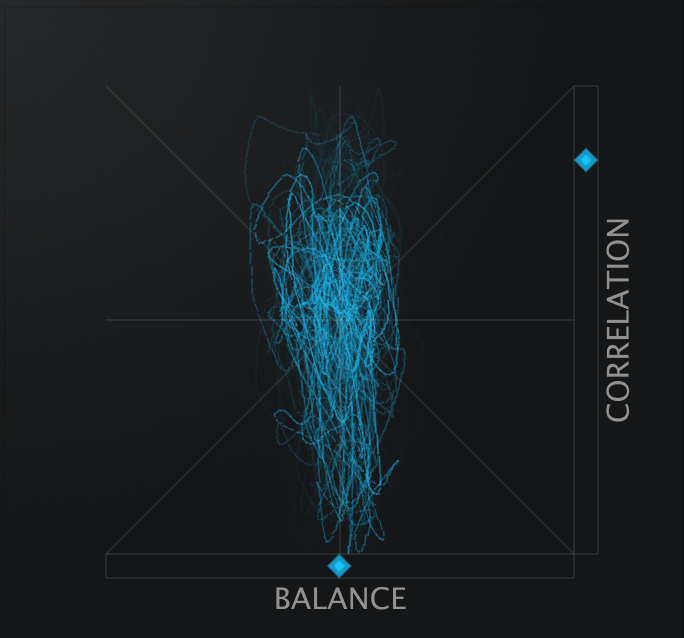
Decibel's phase scope will show the correlation between your left and right channels. The module will help you identify mono signals and indicate when your stereo channels are out of phase. It will also show your stereo image and display if it leans to one side. As a general rule, the more scattered the dots, the more balanced your signal is. And it looks beautiful.
If the Correlation dot sticks to the top (+1): you have a mono signal.
If it sticks to the bottom (-1), it means both your channel are strictly out of phase.
A good-sounding signal usually hangs between the center (0) and the top (+1).
The balance will show you where the energy of our program material is more prominent. Aiming at the center is typically a good thing for a well-balanced signal.
You can choose if you would like to see lines VS dots, choose their thickness and remanence time.
Stereo Cloud
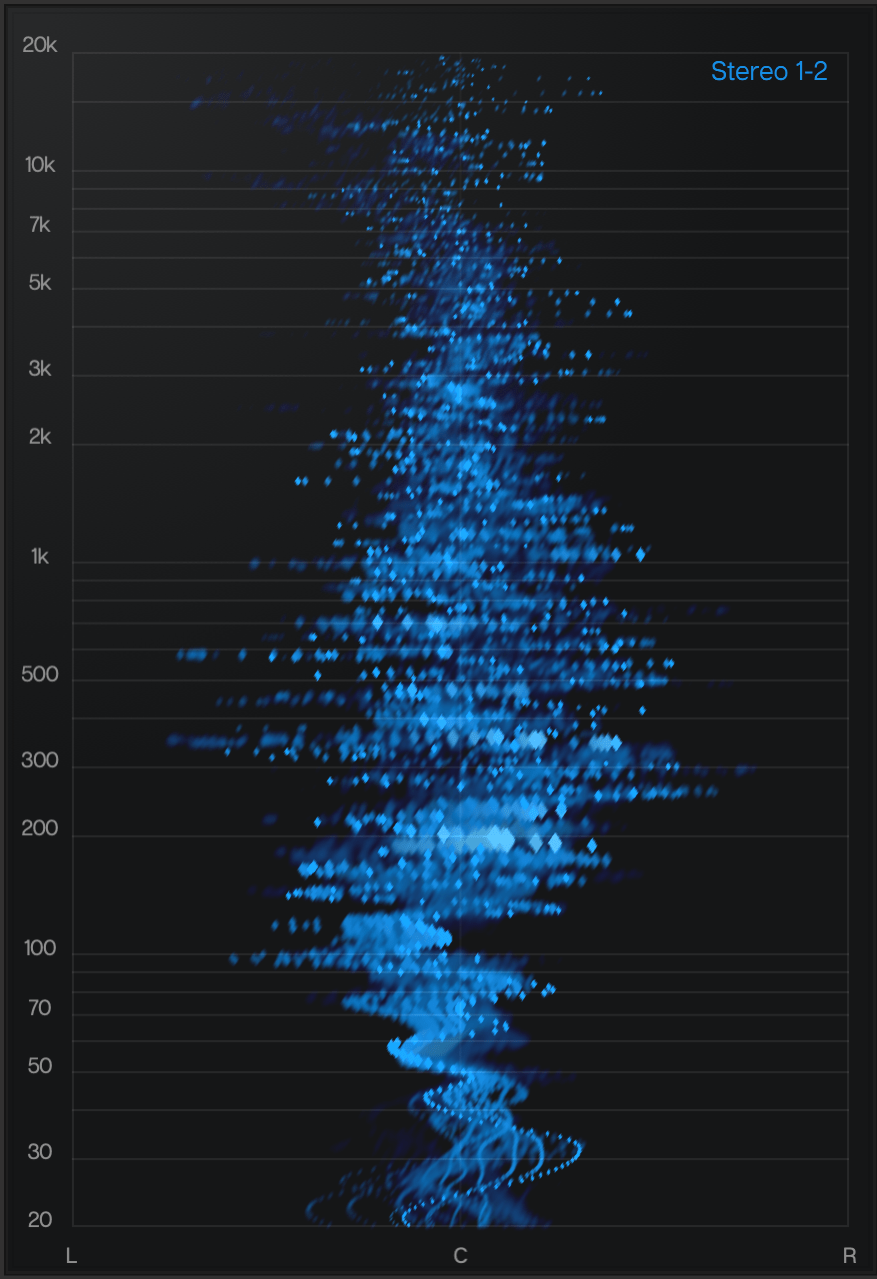
The Stereo Cloud allows you to visualize where the frequencies of your audio material are located in the stereo field. Bass and high frequencies are respectively represented at the bottom and the top of the module. The X-axis represents the stereo field.
The purpose of the Stereo Cloud is for you to be able to visualize what you hear and feel in a precise and innovative way pleasing to the eye.
Decibel uses different colors and gradients to show the intensity of your signal, which will help you locate any frequency build-ups along the Y-Axis. We also encourage you to play with the speed, blur, and afterglow parameters as they will impact the module's reactivity and drawing of the past frames.
This module can be used in mixing in order to spot where an instrument is located in your mix (frequency and panning) as well as in mastering in order to control the width of certain parts of your audio material.
Alert Meter
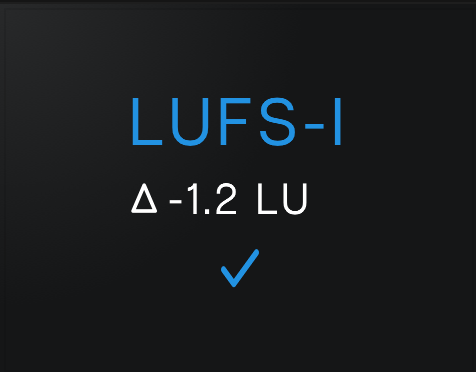
Alert Meters are the perfect way to know if you have met your targets.
Decibel has three targets:
-
Loudness target (LUFS-I), which will light up in blue when your material settles at the desired LUFS level,
-
Loudness Range (LRA), which will light up in blue when your material settles at the desired LRA level,
-
True Peak Max, which will light up in red if exceeded. An absolute must when you want to deliver your material according to draconian specs.
You can customize this module by showing the difference between your current level and your target (Delta).