USER MANUAL
version 1.0.3
Introduction
About PROCESS.AUDIO
Making records used to be about the music. In the recent past, with the advent of the digital workflow, making records has increasingly become an exercise in minutia as well as a plugin arms race, creating a steep learning curve and shifting focus to the tools at the expense of the music. PROCESS.AUDIO was founded by a team of world-class music-making professionals, led by Fab Dupont, to create music-making tools that strike the perfect balance between analog workflow and digital technology only enhancing their owner's process.
About Ripple
Welcome to Ripple, an innovative delay plugin designed to offer a wide range of sonic possibilities. Whether you're after a clean digital delay, warm analog tones, or unique effects chains, Ripple has it all.
It features 5 delay types that will bring authentic colors to your delay, and two unique delay modes, the classical Feedback mode, and the more advanced Repeat mode.
It offers in addition a powerful modulable effects rack with 8 effects that can be either added in the delay loop or after it, and two Low Frequency Oscillators that can modulate all the main controls.
Ripple allows you to sculpt and shape your delay exactly the way you envision, offering complete control over every detail to match your creative vision.
Main Controls / Feedback section
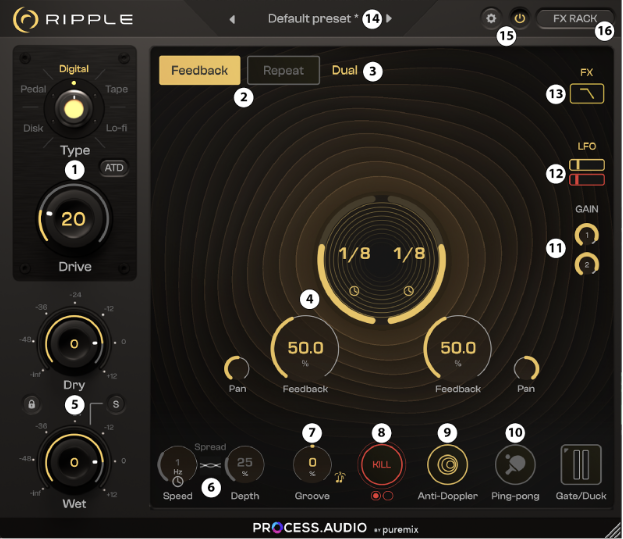
1Delay Types
Ripple allows the user to choose between 5 delay types, emulating classic delay hardware:
- Digital: Goes from a perfectly clean delay to a digitally distorted one.
- Tape: Emulates a famous analog tape delay machine, with its pleasant saturation and subtle wow effect.
- Lofi: Gives a nice degraded and noisy type of sound.
- Disk: Emulates a famous delay based on an analog magnetic drum recorder.
- Pedal: Emulates a famous Bucket Brigade delay, with its crunchy tone.
2Delay Modes
3Dual mode
This mode allows the user to use two independent delay lines at the same time.
4Feedback mode
This is the classic delay mode, where the output is reinjected into the delay line.
5Mix Section
In this section, the user can independently blend the unprocessed (Wet) and the processed (Dry) signals.
6Spread section
Modulate the delay time of the left and right channels differently to enhance the stereo image.
- Speed: Determines the speed of the modulation.
- Depth: Determines the amount of modulation.
7Groove
Ripple gives the user the ability to shift the delays timing to change the overall feeling.
8Kill/Throw
This feature is useful when using Ripple as an insert. It stops the signal from being sent into the delay and gives the user the ability to trigger the delay on specific parts.
9Anti-doppler
By design, changing the time signature of a delay while a sound is currently processed will result in a pitch effect that is sometimes wanted but can be annoying in many cases.
Anti-doppler mode provides an advanced algorithm that smooths transitions between multiple delay lines and sounds more natural when changing the delay time.
10Ping-pong
Ping-pong is a classic delay mode. In a single delay configuration, it will alternate between left and right channels for each repetition. In dual mode, it will create a crossfeed between the delay lines, resulting in more complex rhythms.
11Delay output gains
Adjust the level of each delay line before going into the mix section. In dual mode, it allows the user to place emphasis on one delay over the other.
12LFOs visualizers
Small visualizations of Low Frequency Oscillators. Clicking on it will bypass the LFO. For more controls, the user can open the right panel.
13Current rack effects
Displays the order and status of the currently inserted effects. Clicking on it will activate/bypass the corresponding effect.
14Presets
Ripple comes with 190 presets that range from simple classic delays to complex ambient effects.
15Settings and On/Off
16Right Panel
Opening the right panel gives the user access to rack effects and LFO settings. Clicking on the small icon when the right panel is open will extend the view to show all 8 effects at the same time.
Repeat Section
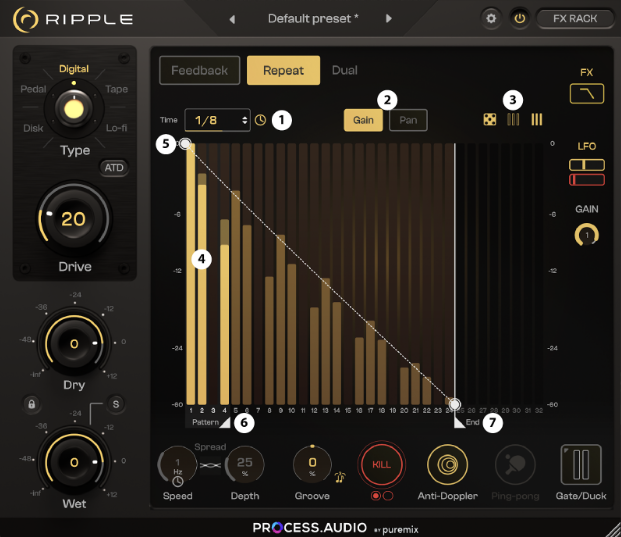
1Delay time
It’s the same parameter as the feedback mode’s delay time. It controls the timing of each delay repetition.
2Gain/Pan view
Switches between the gain or the pan views, where each bar represents the level or the panning.
3Quick access
These buttons allow you to quickly set all bars to :
- Gain view: 0%, 100%, random values
- Pan view: left, center, right, ping-pong or random values
4Repeat bars
Changes the values for each repetition.
5Start/End influence points
Acts as a master level for all the repetitions. It gives the user the ability to make the repetition levels decrease, increase, or stay constant. Moving vertically will change the start/end level, and moving horizontally will change the curve of this master level.
6Pattern slider
The user can move this slider to create a pattern of X bars and repeat it until the last repetition.
7End slider
Determines how many repetitions are used, from 1 to 32.
Gate/Duck panel
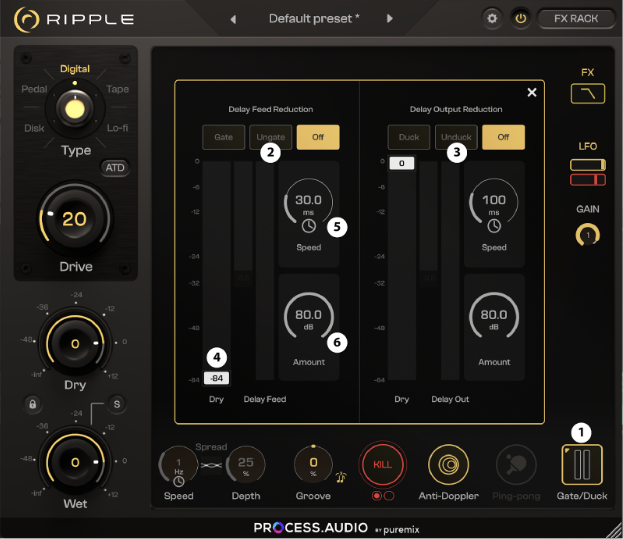
1Gate/Duck Panel button
Show/Hide gate and duck controls. It also allows the user to display their status and reduction amount when the panel is closed.
2Gate
Gate processing will cut or send the signal into the delay depending on the input signal level and the selected mode:
- Off: Gate is not processing.
- Gate: The signal is not sent into the delay until the input level exceeds the threshold value.
- Ungate: Delay input will be cut if the signal exceeds the threshold value.
3Duck
Duck processing will lower the delay output signal depending on whether the input signal is above or below the threshold, based on the mode:
- Off: Duck is not processing.
- Duck: The signal is lowered if the input signal exceeds the threshold value.
- Unduck: The signal is lowered if the input signal is below the threshold value.
4Threshold
Determines the level from which the processing occurs.
5Speed
Sets the speed at which the gate/duck opens and closes.
6Amount
Defines how much the signal is lowered when affected by the gate/duck.
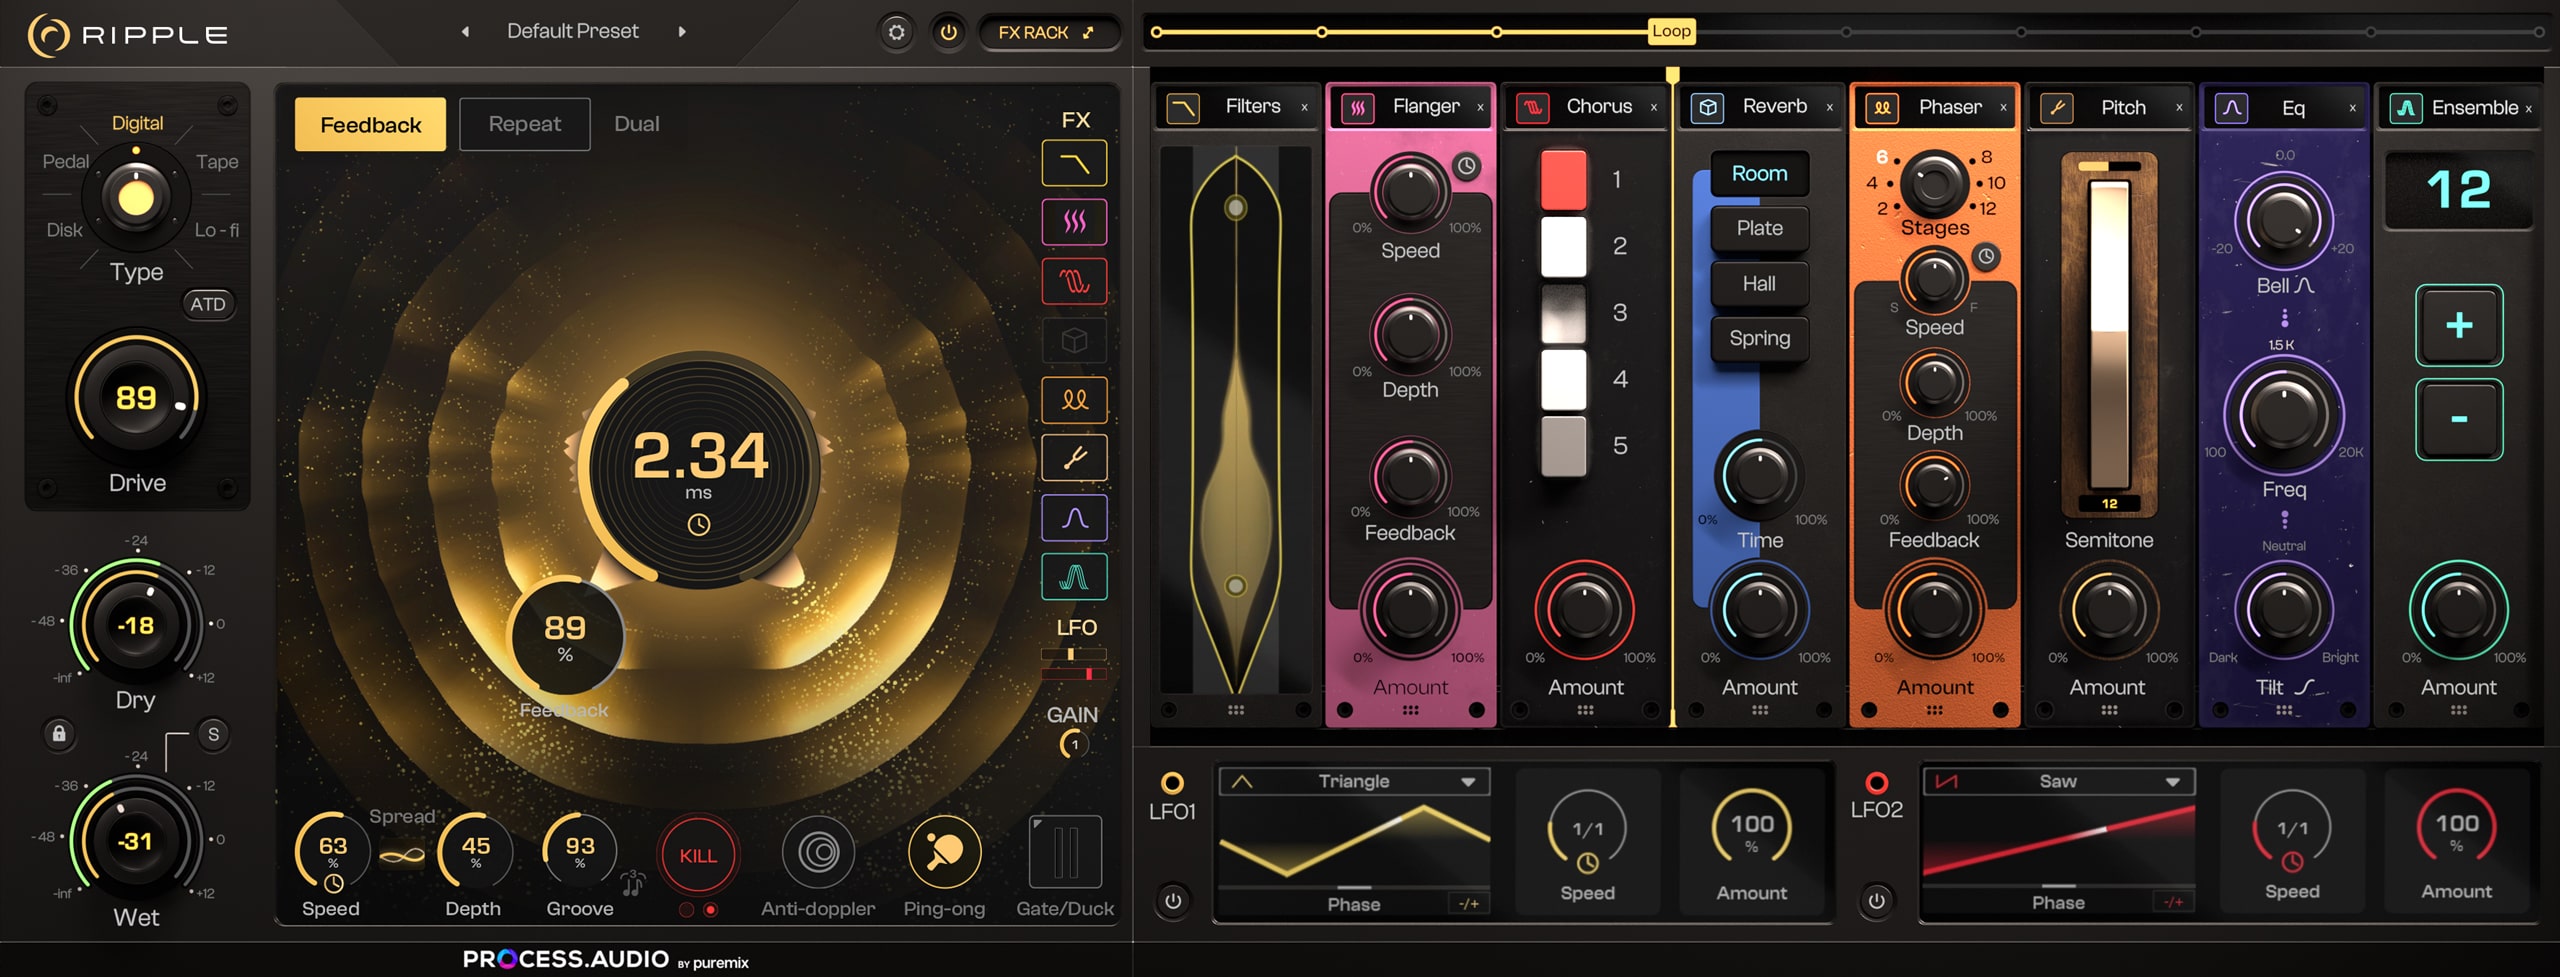
Right Panel
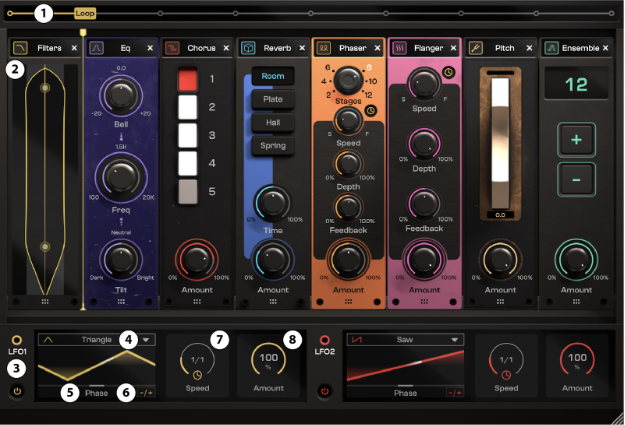
1Loop/Post slider
Rack effects that are inserted on the left side of this slider will process the loop part of the signal, meaning that the signal will be processed at each repetition, resulting in an increasingly drastic effect.
On the other hand, rack effects inserted on the right side of this slider will process the delay output signal.
Note that this is deactivated in repeat mode, as there is no real loop path, and all effects will be placed post-delay.
2Effects
The rack contains 8 effects slots, and 8 effects can be added in any order.
- To add an effect, click on the “+” button and select the wanted effect.
- To bypass an effect, click on the effect icon (top left).
- To replace an effect, click on its name and select the wanted effect.
- To remove an effect, click on the cross icon.
- To move an effect, simply drag and drop it.


3Low Frequency Oscillators
LFOs offer a quick way to modulate parameters over time, creating slight movements to dramatic effects.
To connect an LFO to a parameter, click on the jack socket, then select the wanted parameter by clicking on the corresponding “+” button, and adjust the created amount slider. You can also drag and drop from the jack socket to the slider to modulate.
To see the LFO controls, click on the corresponding “LFO” button.
Click on the bypass button to activate/deactivate the corresponding LFO.
4LFO waveform type
Change the waveform type of the LFO. Available types are: Triangle, Sine, Square, Saw, Inv Saw, Random, Random S&H.
5LFO Phase
Change the LFO’s original phase in order to shift its position over time.
6LFO Polarity
By default, when a parameter is affected by a LFO, its value will oscillate above and under its fixed value. That’s the default bipolar mode.
We’ve added the option to make the LFO modulate only above (positive) or under (negative) the parameter value.
7LFO Speed
Change the speed of the low frequency oscillator. Click on the clock icon to synchronize it with your project BPM.
8LFO Global amount
Globally affects the amount of modulation of all the attached parameters.
Minimum requirements
CPU
Intel Core 2 Duo, AMD Athlon 64 X2 or newer
RAM
4GB or more
OS
Windows 8.1, Windows 10, Windows 11 (64-bit versions only)<br>macOS 10.13 (High Sierra) minimum, Apple Silicon compatible (M1+)
PROTECTION
iLok authorization